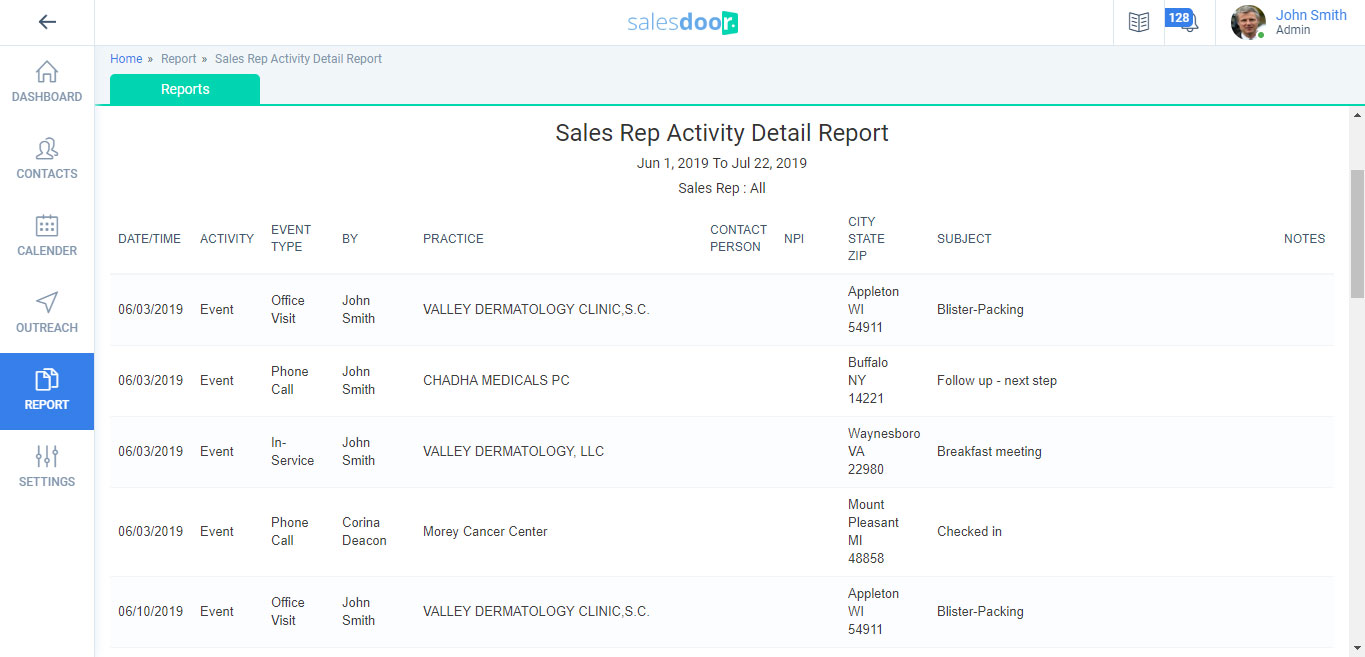
You can upgrade your account to different packages i.e. growing up, advance or enterprise. After your account is upgraded, you will be able to enhance your team to add more team members, able to send more emails, faxes and SMS and import more contacts.
1. Go on your name or picture on the right corner
2. Click on your name or picture on the right corner
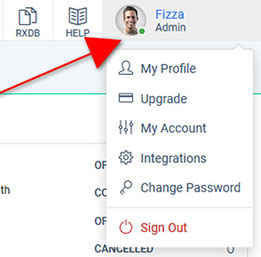
3. Click ‘Upgrade Account’ option.
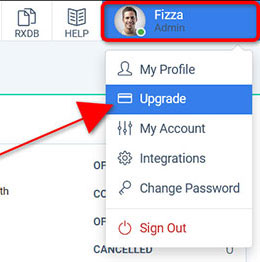
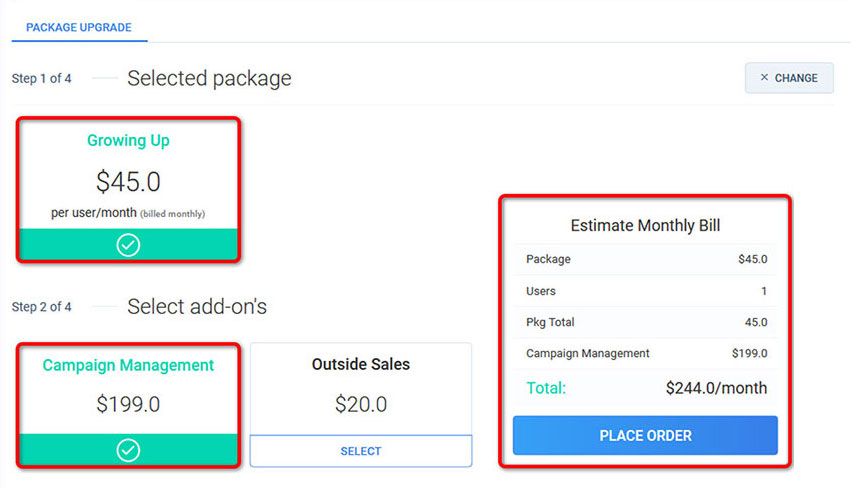
4. Payment process will start.
Select package and select add-on’s
Estimated Monthly Bill is shown on the right
5. Add Payment method > This form will appear
You can create multiple cards and make ONE as default for your transactions.
Fill in the details and click “Submit”.
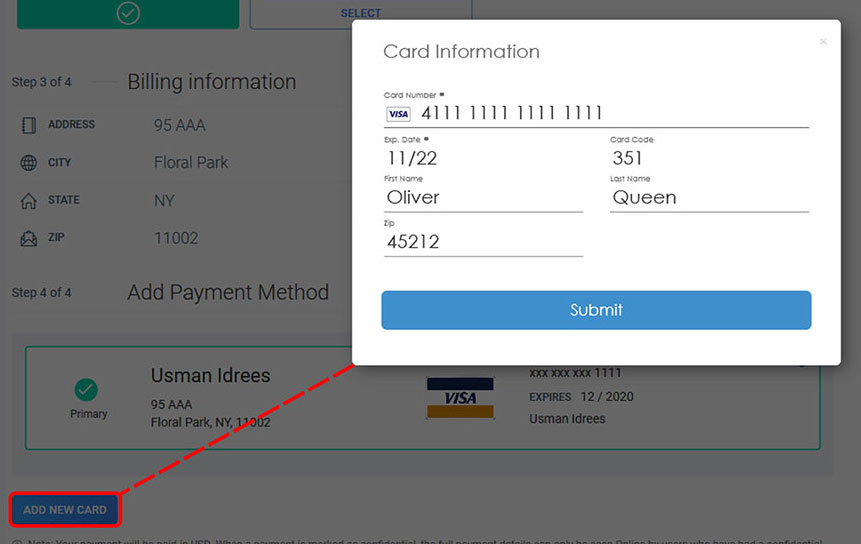
6. Your payment information has been saved.
Now click place order to confirm up gradation.

You can build your team of admins, supervisors and sales reps using this module.
1. Go to Settings > User Management and you will land on to the list of added users.
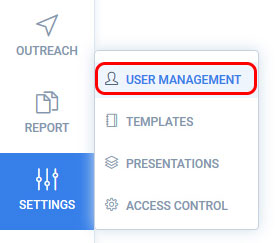
2. Click on “+Add” button to add admin, supervisor or sales representative.
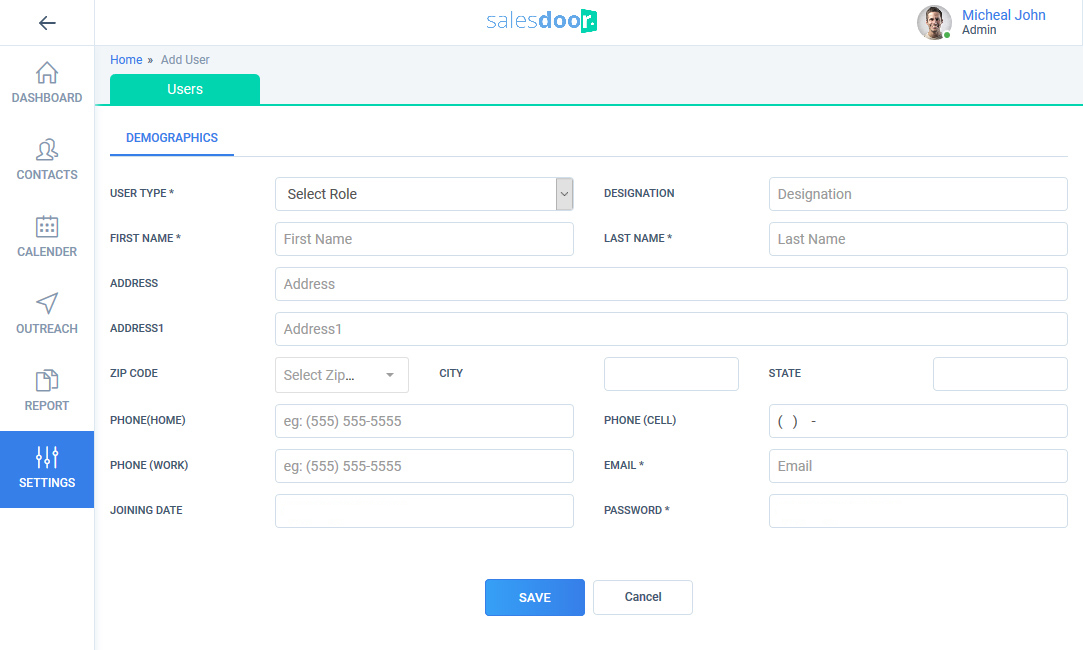
3. Select User type i.e. Admin, Supervisor, Sales Rep and enter all the required information.
4. Click “SAVE” button to save the user in the system.
1. Go to Settings > User Management module, select Supervisor from the list and access Sales Team module.
2. Select desired team member from ‘User’ dropdown. It contains list of all the sales representatives present in the system who are not assigned to any other supervisor.

Supervisors have defined sales territories in which they and their team can work. Territory is a combination of specialty and area i.e. if you have selected specialty as ‘Internal Medicine’ and City as ‘New York’ then you will have access of the contact information of all the doctors and organizations of internal medicine working or situated in New York City.
1. Go to Settings > User Management module and select Supervisor from the list.
2. You will land on Demographics Tab. Click on Sales Territory tab to define territory.
3. Select Specialty, Area or both to define the territory of your supervisor.

After your calendar is configured, application will automatically take you to “Preferences” page. From preferences module, you can set your default landing page, theme color and your time-zone.

Click ‘SAVE’ button to set the preferences.
You can create your own unique templates for sending Email, Fax or SMS. Created template can be used while sending email, fax or SMS to providers and organizations.
1. Go to Settings > Templates module.
2. You will see a list of templates.

1. Click ‘Add ’ button and selected type of template i.e. Email, Fax or SMS. On click a form will open for you to create new template.
2. Enter template name and content of email, fax or sms.
3. Add fields and presentation in the email/fax content and click ‘Save’ button.
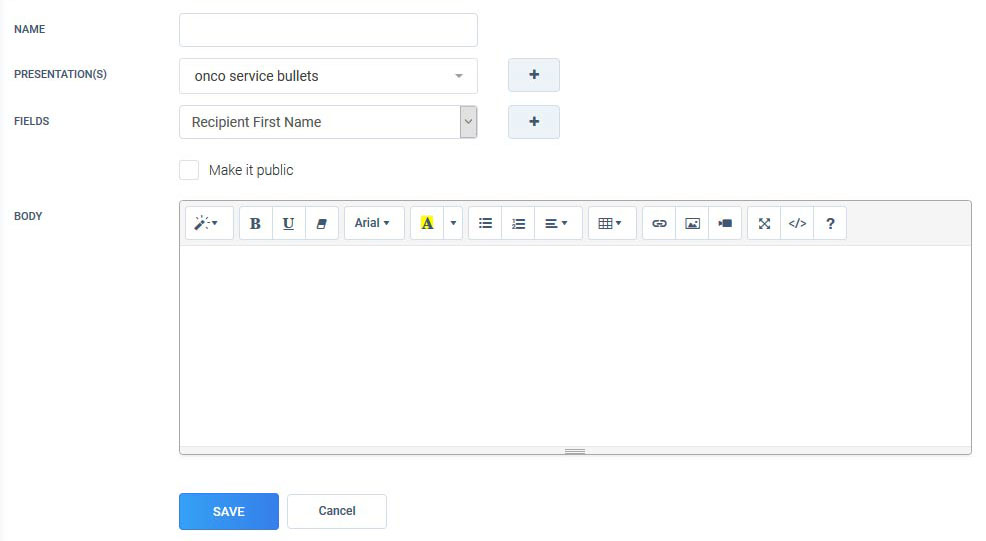
Created template will be available while sending email, fax or SMS. You can see templates created by you or the templates which are created by others but marked as public.
1. On Templates lists page, you will see edit icon with every template.
2. Click on the icon and a form will open for you to make changes.
3. Make changes and click ‘Save’ button to update the template.
You can create presentations in the system which can be added in emails or faxes templates. The presentations which you will add in email content will be sent as a link. In case of Fax, it will be sent alongwith the fax.
1. Go to Settings > Presentations module.
2. You will see a list of presentations.
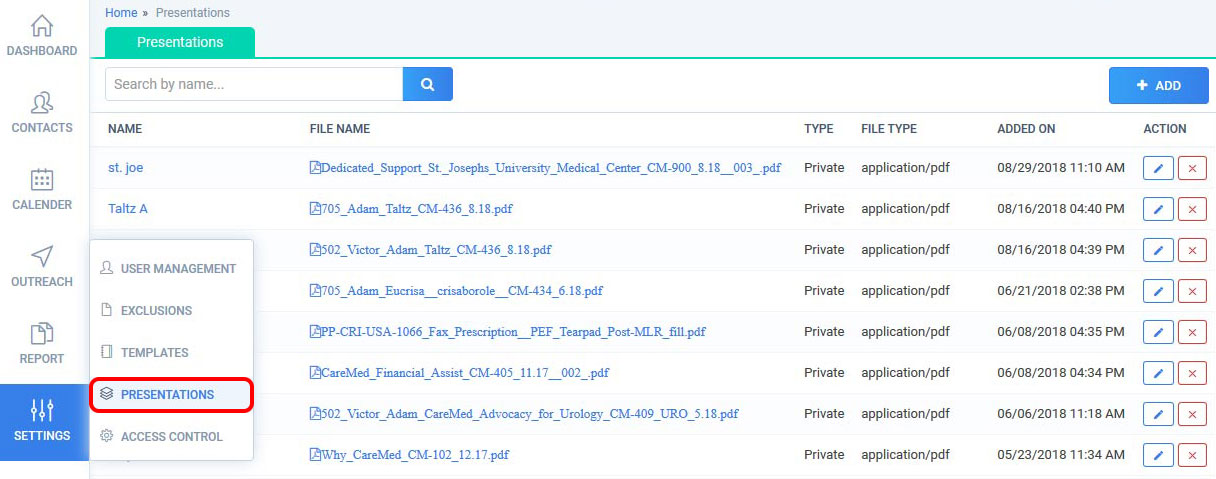
1. Click “Add” button. On click a form will open for you to create new presentation.
2. Enter name, attach file and click ‘Save’ button.
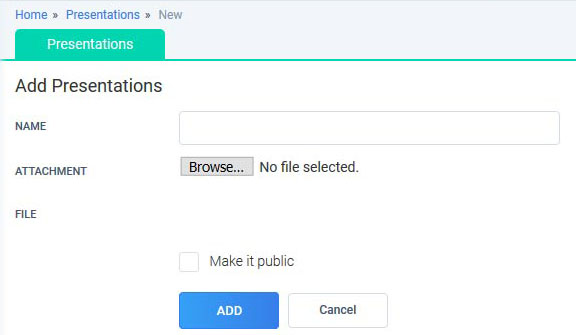
Created presentations will be available while sending email or fax. You can only see presentations created by you or the presentations which are created by others but marked as public.
1. On Presentation lists page, you will see edit icon with every presentation.
2. Click on the icon and a form will open for you to make changes.
3. Make changes and click ‘Save’ button to update the presentation.
1. Click on Settings > Access Control module.
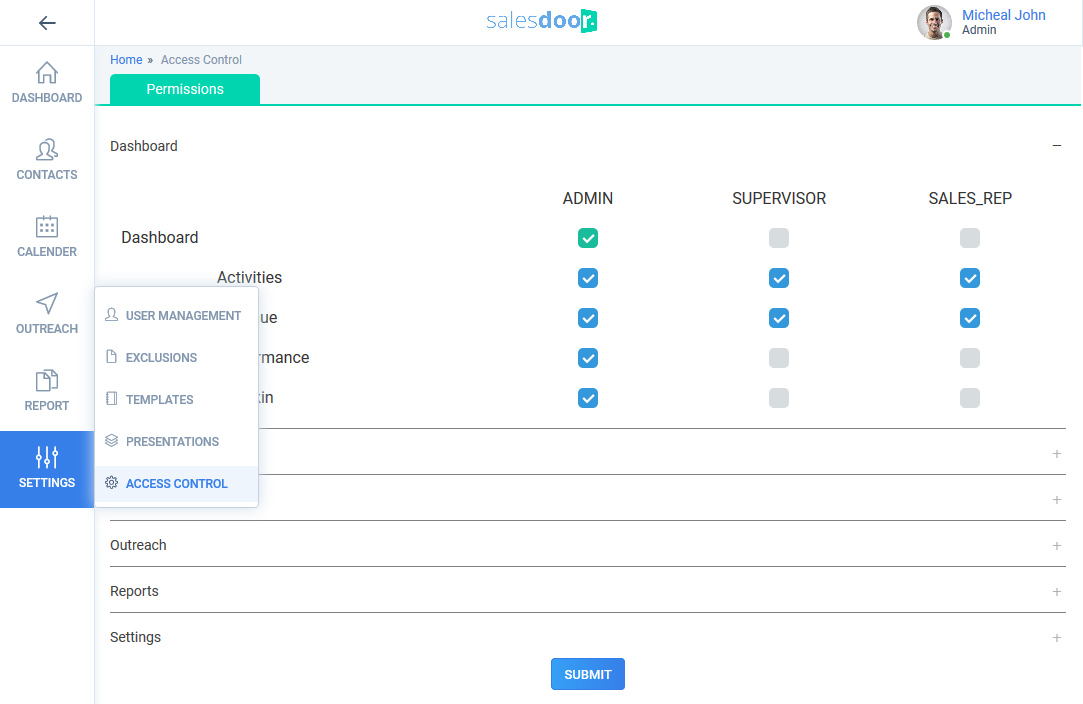
2. You will see access control page listed with all modules.
3. Click on the module for which you wish to set access control.
4. The module will expand showing you the list of features for you to turn on/off for sales rep, admin or supervisor.
5. Check the desired checkbox for turning on and un-check for turning off the feature for selected user type.
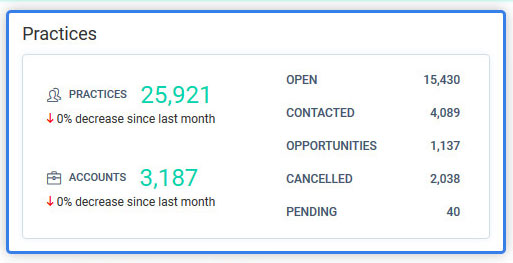
Dashboard shows different KPIs and metrics which are pertinent for you. At glance it is the summary of your or your team’s performance, activities and revenue. Salesdoor dashboard shows you.

1. Total number of organizations in the system.
2. Organizations which are converted to accounts.
3. Organizations in different statuses like open, contacted, oppurtunity, cancelled and pending.
4. Increase or decrease in growth of organizations converted to accounts since last month.
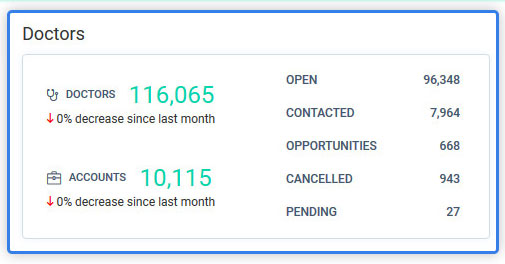
1. Total number of doctors/providers in the system.
2. Doctors which are converted to accounts.
3. Doctors in different statuses like open, contacted, oppurtunity, cancelled and pending.
4. Increase or decrease in growth of doctors converted to accounts since last month.
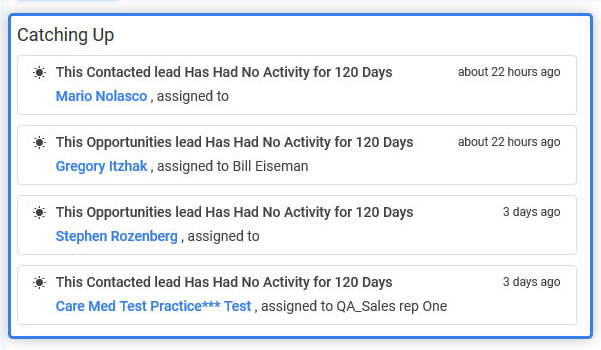
If there are some unattended leads in the system i.e. opportunities for which no action has been taken for 30, 60 or 90 days. System shows messages in Catching Up sections as a reminder for you to take action on them.
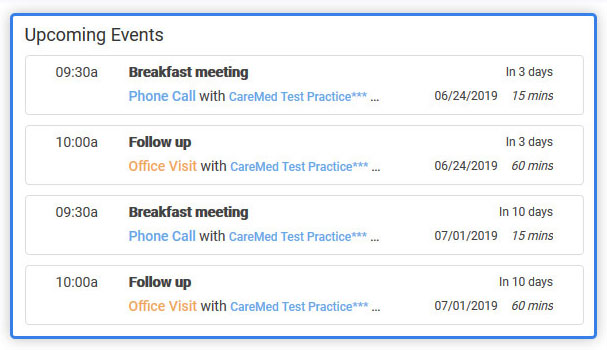
This section shows all your upcoming/future events by displaying date/time of event, subject, event type, duration and organization/doctor name.
Go to Revenue tab and you will see 2 graphs i.e.
1. Revenue trend by Time
2. Revenue trend by Specialty
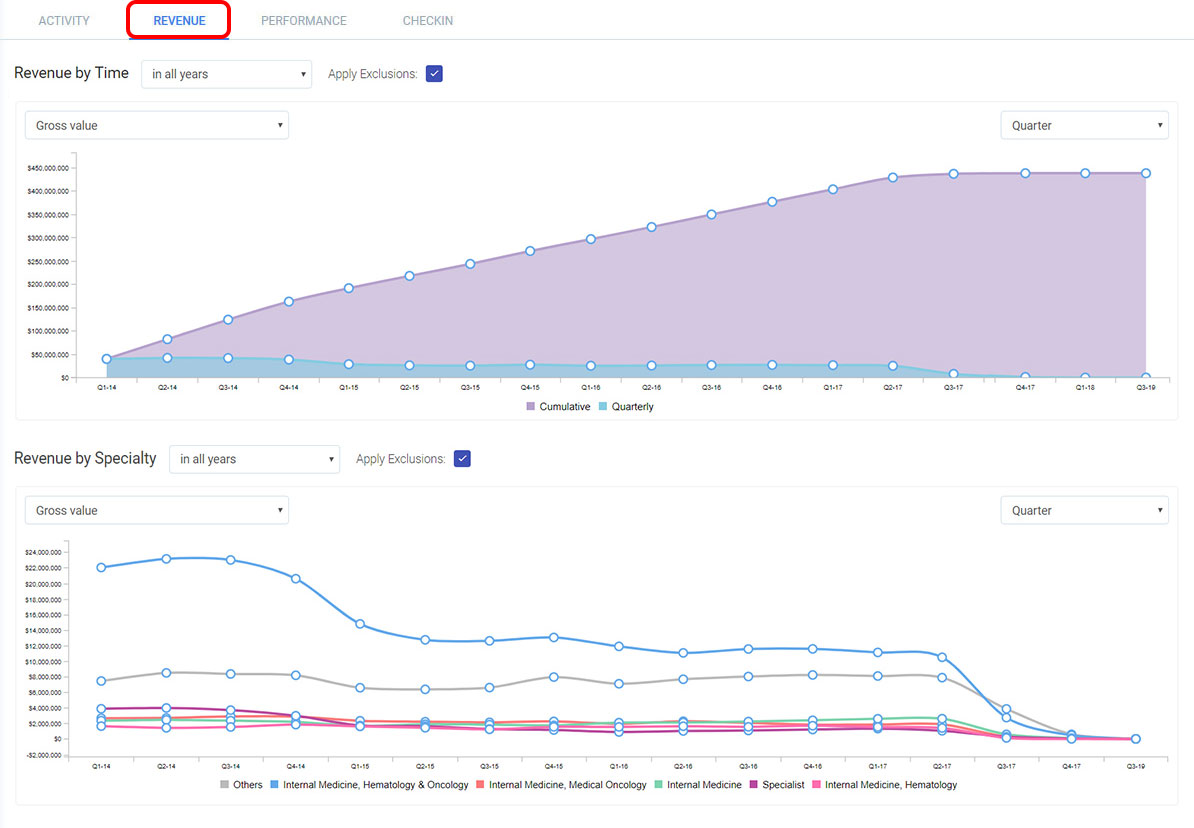
Graphs provide you with the insight on revenue collected on weekly, monthly, quarterly or annually basis. You can check revenue with respect to Gross Value, Net Profit or No. of Scripts. Trend can be seen specialty wise or by time.
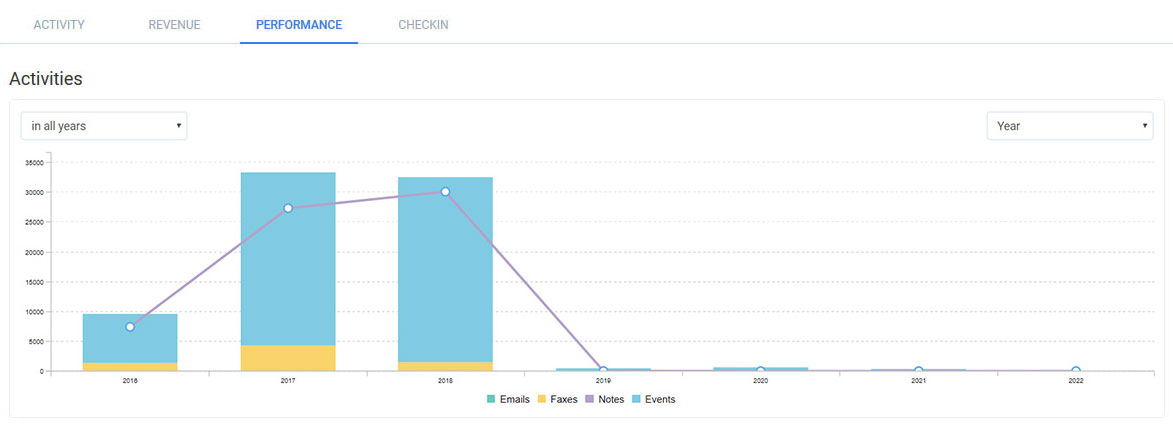
Graphical representation of Team’s activities over the period of time can be monitored by viewing activities graph. This graphs shows the performance of entire team with respect to number of emails, faxes, notes and events created/sent to organizations and providers weekly, monthly, quarterly or annually.
You can monitor performance of entire team or single individual.
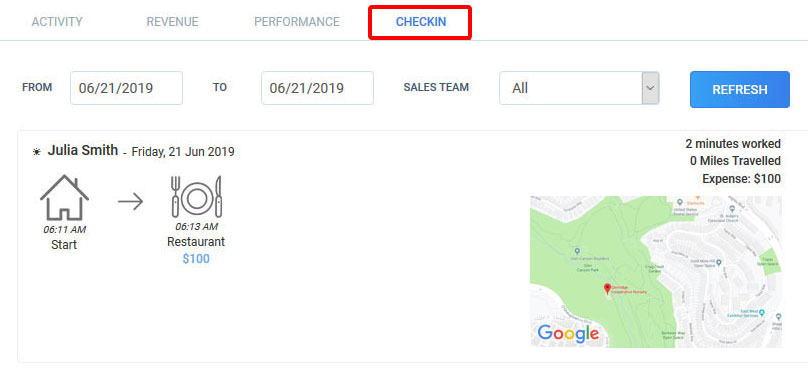
If you or your team is using mobile application to track outside sales team then our checkin module will give you a snapshot of your daily activities and path you or your team took the entire day to accomplish particular task. It also shows total distance travelled by outside sales representative and expenses he/she has made during the day. The checkins are graphically displayed.
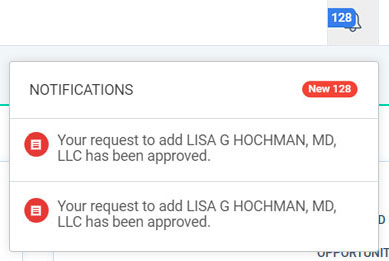
You can view system notifications by click notification icon. All notifications generated by the system will be listed in the drop menu.
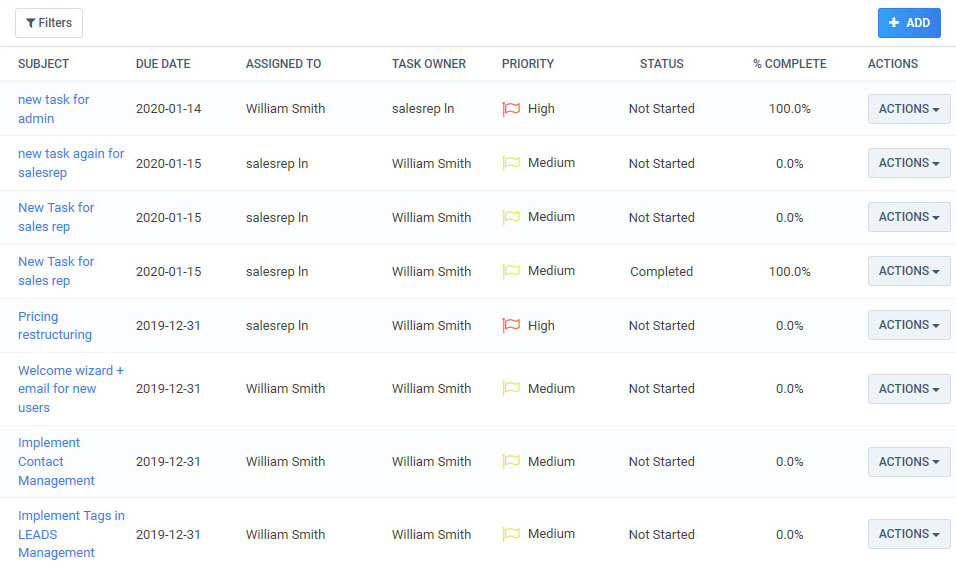
Task is an activity that needs to be accomplished within a defined time period or by a deadline. It is a small essential piece of a job that serves as a means to differentiate various components of a venture.
Task management is more than a to-do list. It helps tracking tasks from beginning to end, delegating tasks to team, and setting deadlines to make sure projects get done on time
Salesdoor task management module ensures that tasks don’t slip through the cracks. With task management, you’ll know exactly what to do to push deals forward at every step.
With Salesdoor, set up tasks for yourself or assign them to others in your team.
My tasks section shows your own tasks and under delegated tasks section you can see tasks that have been passed on to other user.
Click on the + Add button and this form will appear
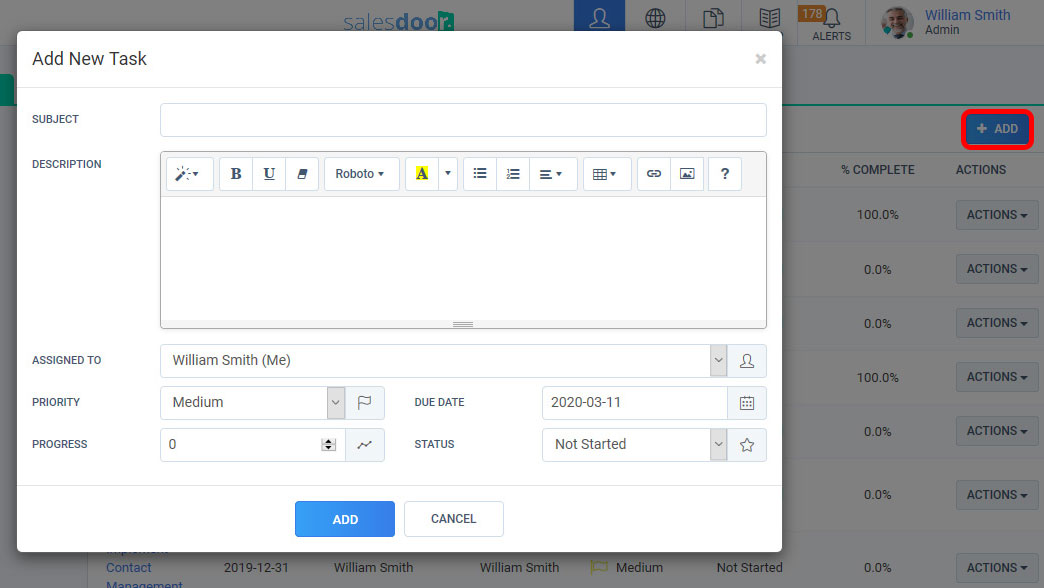
Fill in the fields, Subject, Description, assigned to, Priority level, due date, progress and status.
Click Add button to save task.
Email will be sent to assigned person to notify about the task created.
Task can be edited by clicking on the task subject or through actions drop down menu.

Form will appear, make changes and save.
If task status is marked as complete by the assigned person, assignee will be notified through email and progress will be marked as 100% complete.
Click on actions dropdown menu and select delete, confirmation message will appear, click delete to remove the task.
1. To add new organization manually, go to Leads > then click Organizations.

2. Organizations List page will appear. Now click on the Add button.

3. This form will appear.

4. Fill in all the required information and hit ‘SAVE’ button.

5. Recently added organization will appear in Organizations list.

1. To add new provider manually, go to Leads >then click providers.

2. Providers List page will appear. Now click on the Add button

3. This form will appear.

4. Fill in all the required information and hit ‘SAVE’ button

5. Recently added organization will appear in Providers list.

1. Go to Leads > Patients List page
Click ‘Add’ on the top right corner

2.This form will appear

3. Fill in the form and click ‘Save’
Saved patient will appear in patient list

We have 800,000 organizations and providers in Salesdoor Library from all across United States. You can import the contacts i.e. organizations and providers using system library.
1. Go to Leads > Organizations module to import organizations OR
Providers module to import providers.

2. Click cLib button to import organizations and providers from Centralized library.

3. A form opens for you to enter search criteria i.e. NPI, Organization Name, taxonomy, zipcode, city or state.

4. Provide Search criteria as per your need and click ‘SEARCH’ button to view results.

5. If you want to import all contacts just checked the “NPI” check-box. By default all the records will be selected.

6. Click ‘IMPORT’ button to import selected contacts in the system.

7. You can find all the organizations in organizations and Providers in providers list.

You can import you existing leads from the excel file.
1. Go to Leads > Organizations list and click on ‘IMPORT’ button to import organizations

2. This popup will appear

3. Upload or drag/drop excel file with extension .xls or .xlxs
4. Click ‘NEXT’ button to move to next step where you will have to map the data in your file with our database fields.

5. Dropdowns in ‘Column Headers from File’ contains the headers from your file. Select and map headers with the fields in our database.
6. Click ‘Next’ button to move to next step
7. System will take your consent on associating providers and organizations on the basis of phone number.

Note:
If you click ‘Yes’, system will automatically import and associate providers and organizations on finding same phone number.
If you click ‘No’, system will only import the contacts.
8. Click ‘Next’ button again to see the status of import.

1. First you click on organization name which you created.
2. Click on Edit Icon to edit details you entered at the time of adding the contact.

3. Make changes and click ‘Save’ button to update the changes.

1. First you go to organization list page. Click on edit icon from Actions drop down. You’ll land on to the organization page.

2. Click on Edit Icon to edit details you entered at the time of adding the contact.

1. Go to patients list page> select patient > click ‘Actions’ > click ‘Edit’.

2. You’ll land onto patients detailed page.
Make required changes and click ‘Save’.

You can add multiple contact persons for the organization. For each contact person, you can create note, event, send SMS, email, fax and can also assigned providers that are associated with the organization.
1. Go to Organization detail page > Contacts and click ‘ADD’ button.
2. A form to create new contact person opens.

3. Enter name, designation, contact information and business card.
4. Click ‘SAVE’ button to add new contact person for the organization. The added contact will appear in contacts list.

1. Go to Organization Detail Page > Contacts section.
2. On Contacts list page, you will see Providers dropdown.

3. Click on the dropdown to view list of providers associated with organization.
4. Select Provider from the list to assign.

1. Go to Practice detail page > Contacts.
2. Go contact person you wish to edit.
3. Go to Actions drop down menu and click Edit.

4. A form opens in edit mode for you to make changes.

5. Edit information and click ‘SAVE’ button to update contact person details.
1. Go to Practice detail page > Contacts.
2. Search the contact person you wish to delete.
3. Go to Actions drop down menu and click delete.

4. Confirm the deletion action and your contact person will be deleted.

1. Go to Practice detail page > Contacts.
2. Search the contact person for whom you wish to Create Note, Event, SMS, Email or Fax.
3. Click on Action drop menu and you will see note, send Email, Send Fax, Send text options.

4. Click on desired option.
Note: creation of above activity is explained in below relevant sections.
You can create multiple notes on the communication with the contact for record keeping. Workflow to create a note is same across the application.
You can create note from following areas:
For understanding we have explained the workflow from practice detail page.
1. Go to Leads > Practices > Practice Detail page.
2. Click on Activity > Notes Tab.

3. Click Actions button drop down menu and click Create Note, this form will appear.

Add description, add file, mention time spent, mention created for, select event type, date & time.
Now click Create button

4. Upon click, the note will be created and you can see your note both in Provider/Practice > Notes and Outreach > Notes modules
You can edit the note from Notes list from practice, provider and practice list page and from outreach>notes module.
List page
1. Go to Notes list page.
2. Mouse over the note and you will see edit and delete icons.
3. Click on Edit icon to edit the note Or delete icon to delete the note.
Outreach > Notes Module
1. Go to the desired note you wish to edit or delete
2. Click on Edit icon to edit the note Or delete icon to delete the note.

You can send emails to practice contact persons, providers and patients. Email can be sent from multiple workflows but the functionality is same across the application apart from Mailbox.
Areas from where the email can be sent:
For understanding we have explained the workflow from practice detail page.
1. Go to Leads > Practices > Practice Detail page.
2. Click on Activity > Email Tab.
You will see all the emails sent to the practice contact person in this Tab.

3. Click Actions button drop down menu and click Create Email, this form will appear.

4. Draft your email and click ‘SEND’ button to send email to contact person and/or providers.
Send Email from Mailbox
1. Go to Mailbox.

2. Click Create button, select from account, list of all configured account will be visible. Choose account from where you desire to send an email.

3. Draft email and click send to send the email.

You can send and receive SMS to practice contact persons, providers and patients.
Note: You’ll need to contact Salesdoor team to integrate phone number with your account. Once phone number is integrated you’ll be able to send and receive text messages seamlessly.
Send SMS
SMS can be sent from multiple workflows but the functionality is same across the application apart from outreach.
Areas from where the SMS can be sent
For understanding we have explained the workflow from practice detail page.
1. Go to Leads > Practices > Practice Detail page.
2. Click on Activity > SMS Tab.
You will see all the SMS sent to the practice contact person in this Tab.

3. Click Actions button drop down menu and click Send Text, this form will appear.

4. Phone number will be auto filled, draft message and Click Send to shoot text.

Send Text from Outreach
1. Go to Outreach>Text

2. Click Create button and this form will appear.

3. Mention the contact you want to send Text, draft message and Click Send to shoot text.

Receive SMS
Recipient can reply back to the SMS you sent
1. Upon receiving a reply, you’ll be notified by an alert.
2. Open text to view SMS.
Sender of the SMS is mentioned here
You can send multiple faxes to practice contact persons, providers and patients. Faxes can be sent from multiple workflows but the functionality is same across the application.
Areas from where the Fax can be sent:
For understanding we have explained the workflow from practice detail page.
1. Go to Leads > Practices > Practice Detail page.
2. Click on Activity > Faxes Tab. You will see all the Fax sent to the practice contact person in this Tab.

3. Click Actions button drop down menu and click Send Fax, this form will appear.

From practice module, you can send fax to practice contact person, patients or the providers working in the practice provided if they have fax number saved in their profile.
4. Draft your Fax and click ‘SEND’ button to send Fax to contact person, providers and/or patients.

Send Fax from Outreach
1. Go to Outreach>Fax

2. Click Create button and this form will appear.

3. Mention the contact you want to send Fax, Draft fax and Click Send to shoot Fax.

You can create an event against practice, contact persons, providers and patients. Event can be created from multiple workflows but the functionality is same across the application apart from Dashboard.
Areas from where the email can be sent:
For understanding we have explained the workflow from practice detail page.
1. Go to Leads > Practices > Practice Detail page.
2. Upcoming events against this practice are listed here.

3. To create new event Click on + Sign from Upcoming events sections.
This form will appear. Fill in the details and click save to save the event or click save and create to create the event.

4. Created event is listed here.

Create event from Dashboard
From activity section in Dashboard we see a subsection for upcoming events. It contains the list of all upcoming events.

To create new event, Click here

This pop up will appear, select your event type from the drop down menu.

Upon choosing the event type, this form will appear. Fill in the details and click save to save the event or click save and create to create the event.

Edit an Event
Click an event, make required changes and Save.

Delete an Event
To delete an event, click the event.
Click the delete button to remove the event.
Event is removed from the list.

You can associate providers with practice and vice versa.
1. Go to Practice detail page > Providers.
2. Associate provider by typing provider name in ‘Associate Providers from Library” field.
3. Select desired Provider to add in the list.

Note: if provider is not in the list, you can add provider from this workflow. The provider added from this workflow will automatically be associated with the selected practice.
You can perform multiple functions from this workflow:
You can associate practice with provider.
1. Go to Providers detail page > Practice.
2. Associate practice by typing practice name in ‘Associate Practice from Library” field.
3. Select desired Practice to add in the list.

Note: if practice is not in the list, you can add practice from this workflow. The practice added from this workflow will automatically be associated with the selected provider.
You can perform multiple functions from this workflow:
You can view Practices, Providers and Patients in different statuses.
Note: The flow is the same for Practices, Providers and Patients.
1. Go to Leads > Practices to see the practices statuses.
2. Click on status buckets in left panel. Upon click, you will see the practices in the selected status. By default, list will show you all leads as per your access rights.

You can change the status of the Practice, Provider and Patient from their:
Status can be open, contacted, opportunity, account, cancelled or pending.
Note: The flow is the same for Practices, Providers and Patients.
From Practice List
1. Go to Leads > Practices list page. You will see status dropdown with every practice record.

2. Click on status dropdown and select relevant status.
3. Upon selection, your practice status will change.

From Practice Detail page
1. Go to Leads > Practices > Practice Detail page

2. Click on the status arrow.
3. Upon your click, practice status will change.

You can assign practice, provider and patient to the team from list page and detail page.
Note: The flow is the same for Practices, Providers and Patients
From List Page
1. Go to Leads > Practices list page > Providers list page.
2. You will see ‘Assigned To’ dropdown with every practice record.

3. Click on ‘Assigned To’ dropdown and select team member you want to assign to.

1. Go to Contacts and you will land on the contact list page showing contacts which are added in the system.
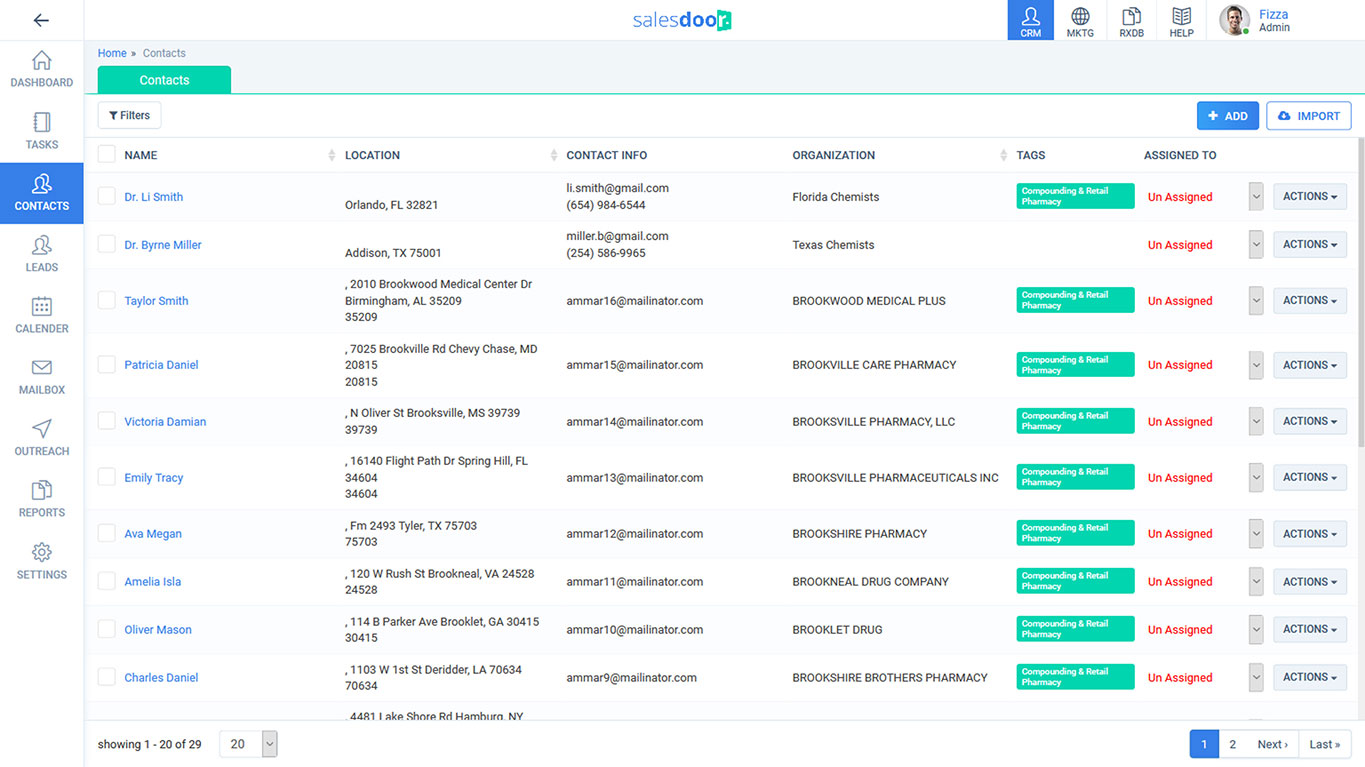
2. Click on + ADD button on the top right and this form will appear.
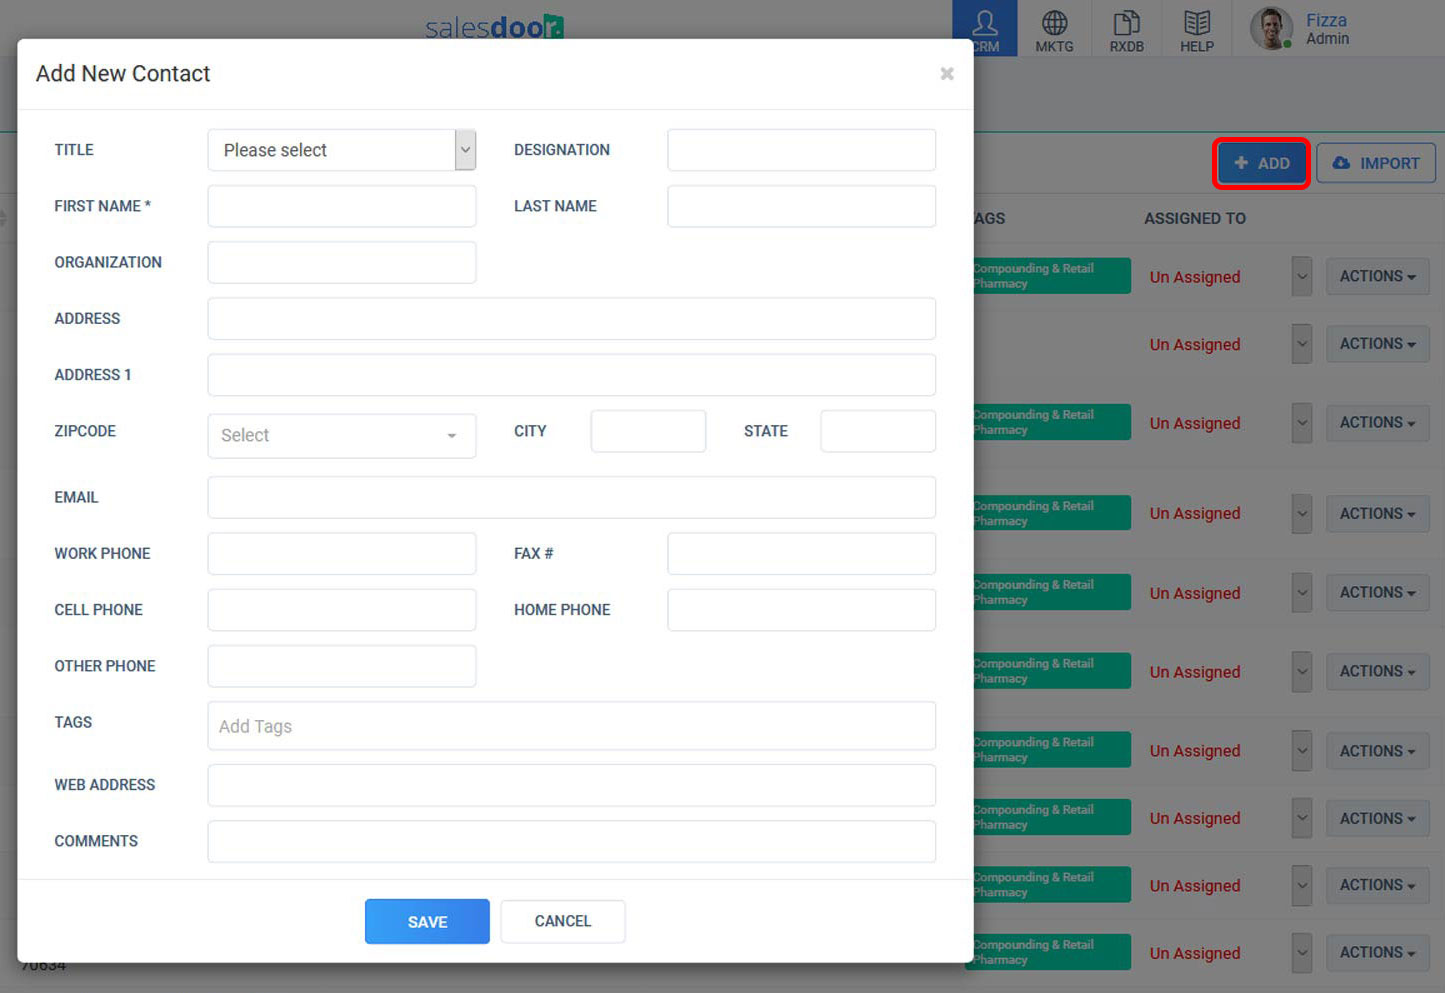
3. Add contact information such as name, designation, organization and contact information. Hit SAVE button.
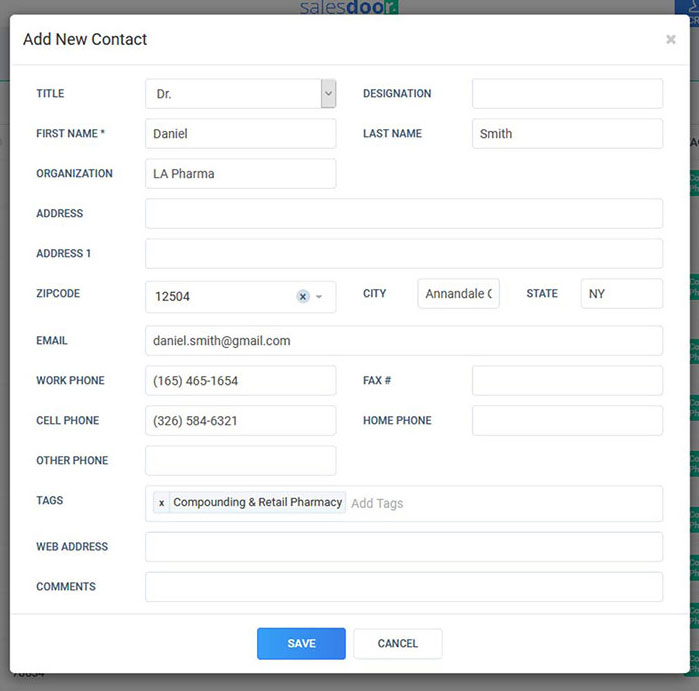
4. System will add your contact in contacts list.

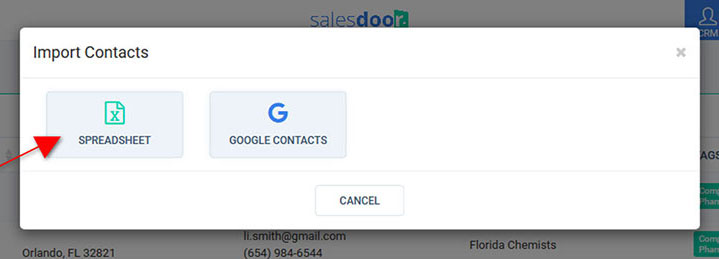
1. Click on Import button on the top right. Choose from where you want to import contacts.

2. Import contact through excel sheet.
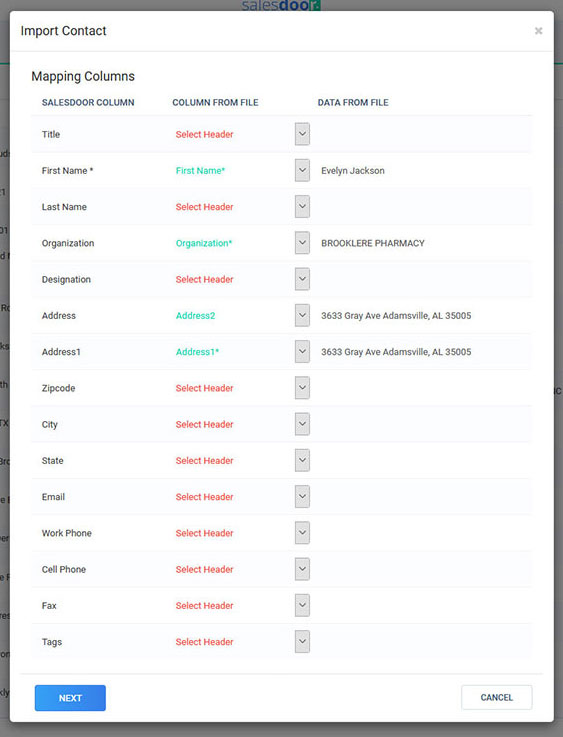
3. Map columns accordingly. Only First name field is mandatory. After mapping columns click next.
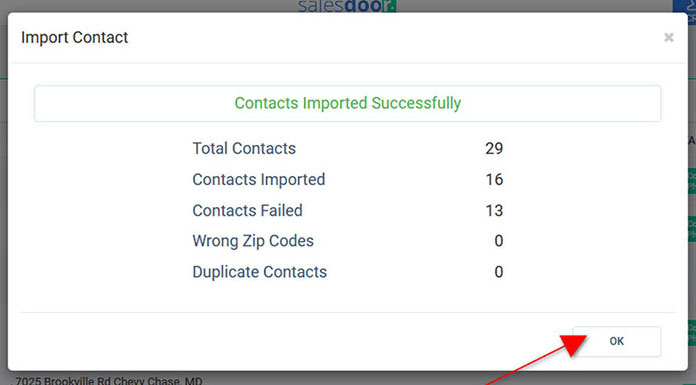
4. After successfully contacts import. This pop up will appear. Click OK to continue.
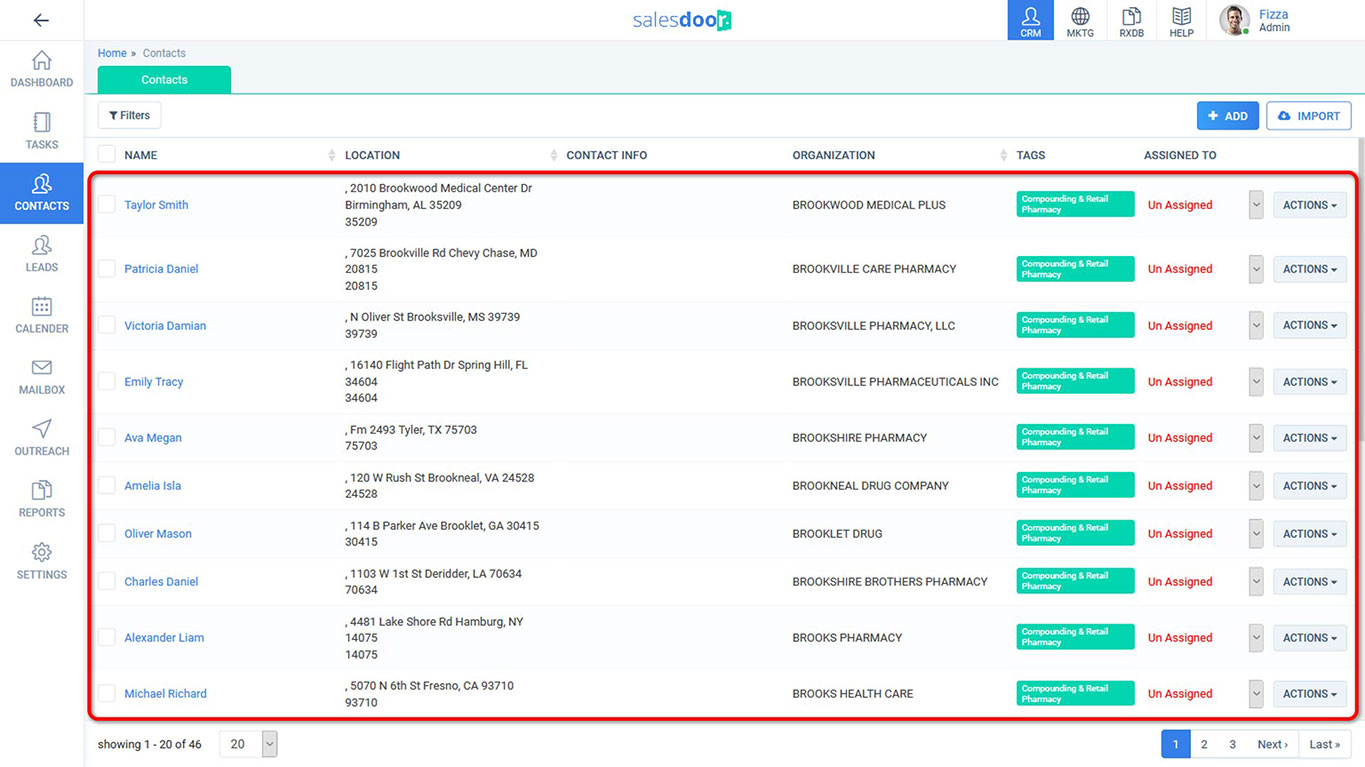
5. Recently added contacts will appear in the contacts list.
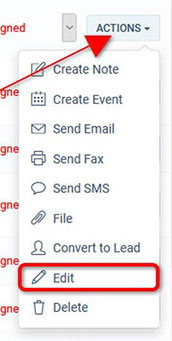
1. Go to contacts page and select actions. Then select edit.
2. Contact inside page will appear.
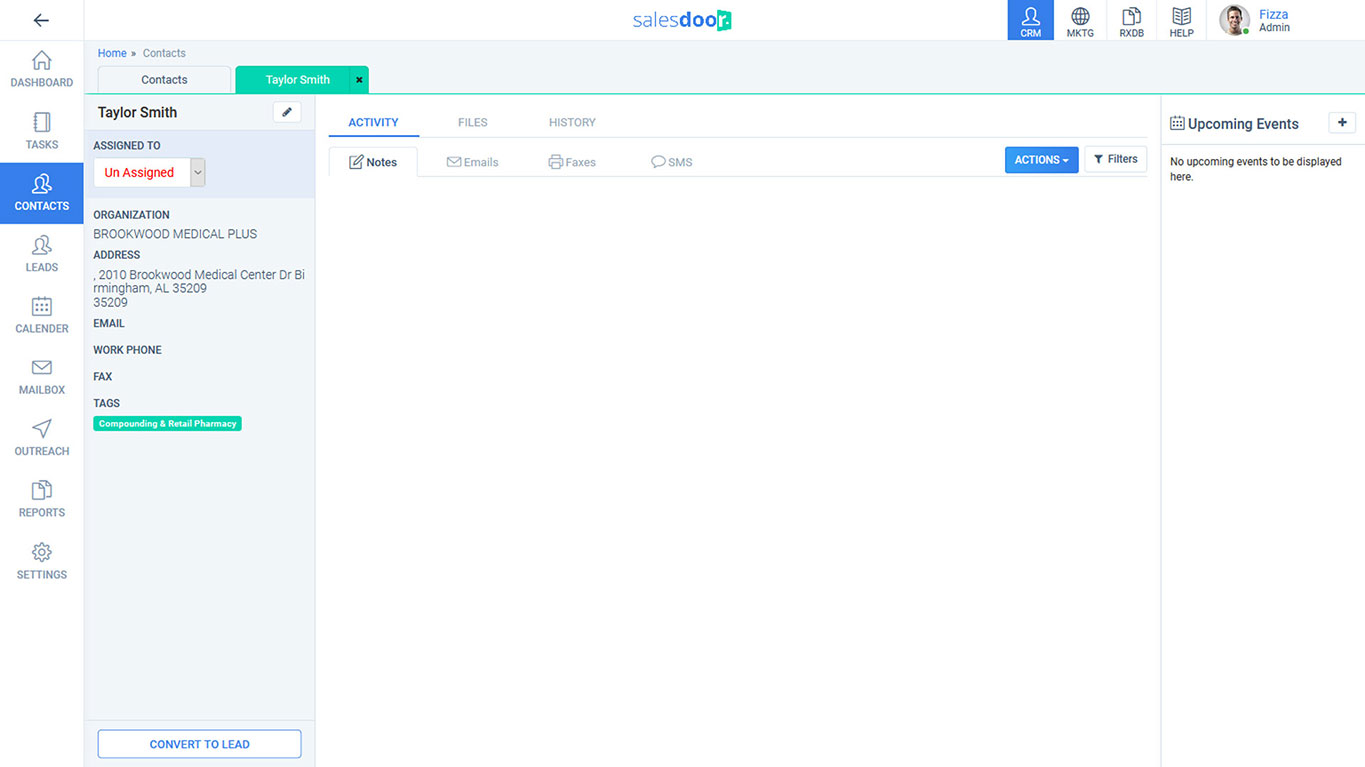
3. Click Save button to update the changes.

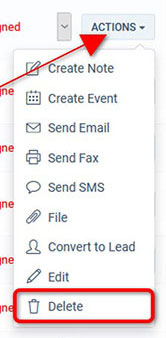
1. Go to contact page. To delete a single contact , go to actions and then click delete.
2. To delete multiple contacts in one time. Select multiple contacts and click More button on the top.
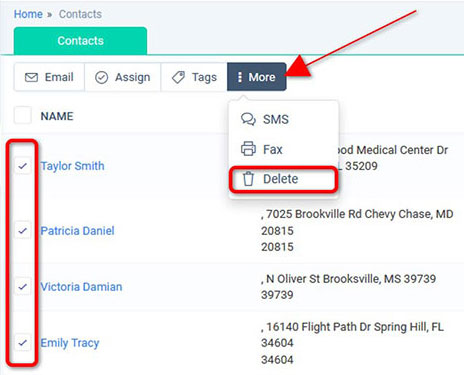
3. Choose Deleteto remove the contacts from the list.

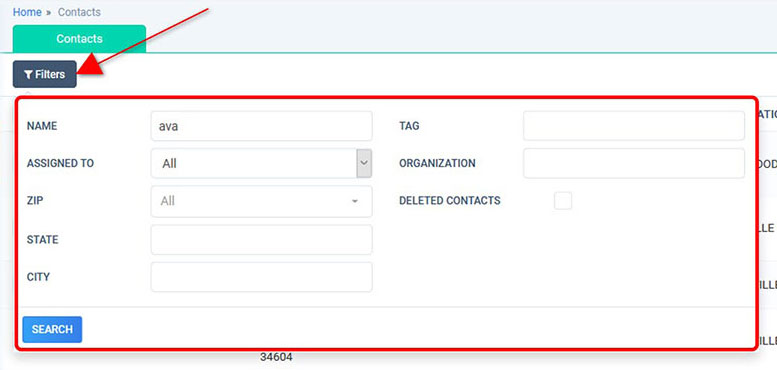
1. Go to Contacts page. Use filter to search the contact person of whom you wish to Create Note, Event, SMS, Email or Fax.
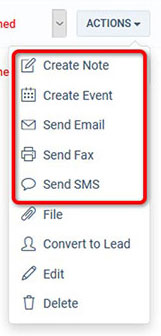
2. Option 1 Click Actions and create note, SMS, email etc.
3. Option 2 Click contact name and you’ll land on to contacts inside page.

There are two ways to assign an unassigned contact to any of your team members or to change the assignee.
1. Option 1 Go to contacts list page> choose contact >click assign button and choose the person you want to assign to.
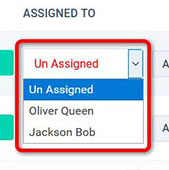
2. Option 2 Go to contacts list page> choose contact. You’ll land onto contact inside page.
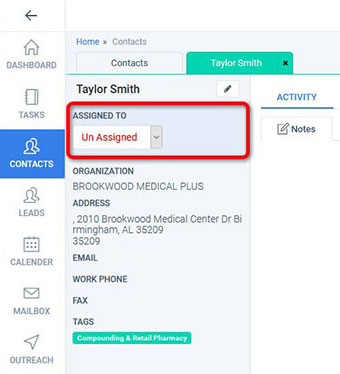
From ‘assigned to’ button add or change assignee. This pop up will appear

Click Yes to confirm changes.
You can convert a contact to lead from contact list page and contact inside page.
1. Click contact and you’ll land on to contact’s inside page. Click ‘convert to lead’ and this form will appear
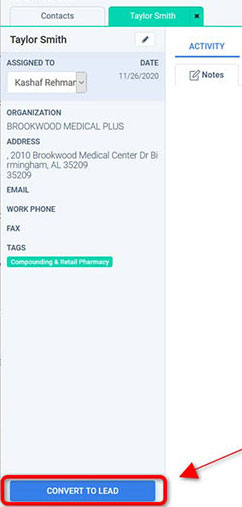
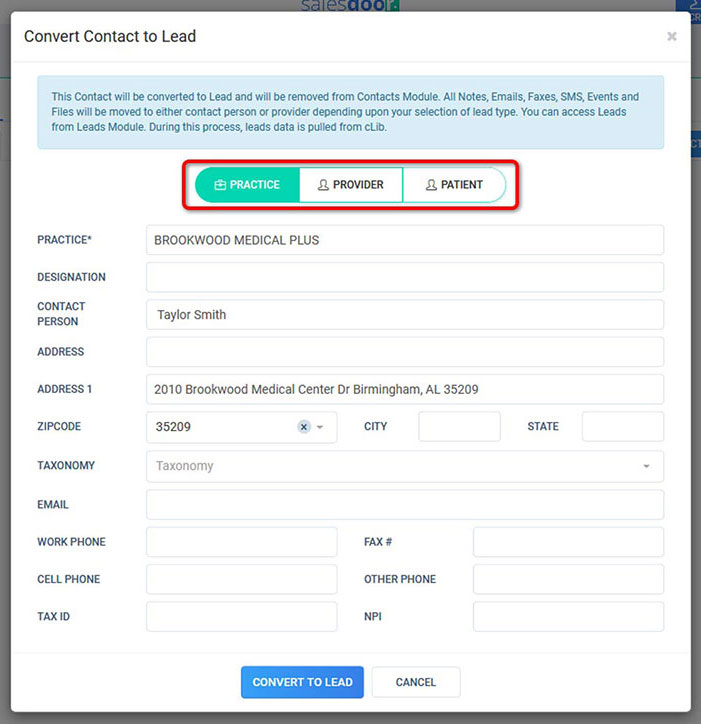
2. Choose what you want the contact to be provider, organization or organization.
3. Fill in the form and click ‘convert to lead’.
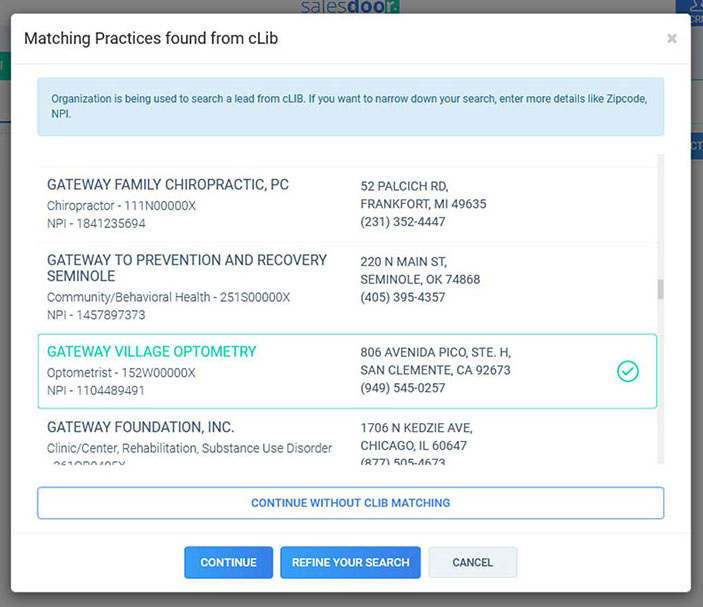
You can match organizations and providers found from cLib and can continue without matching the contact with cLib.
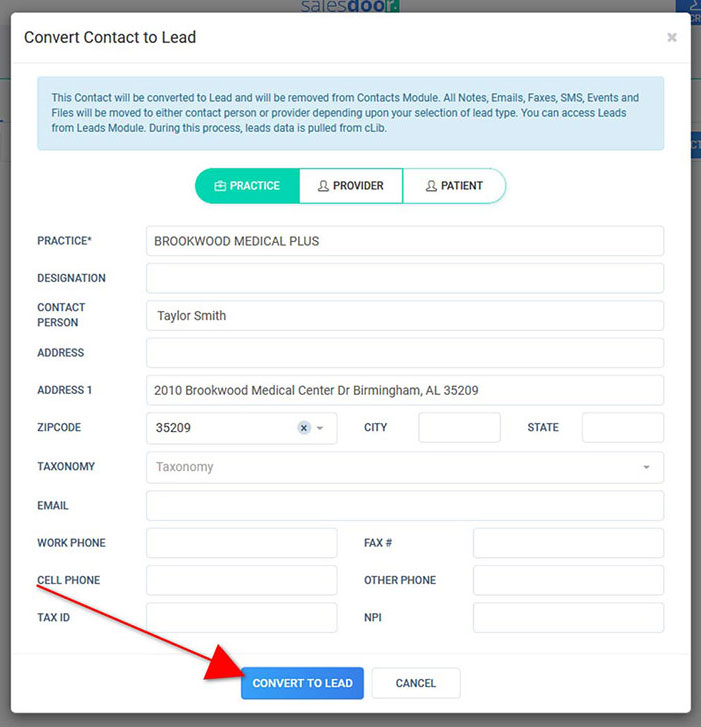
Confirm ‘convert to lead’
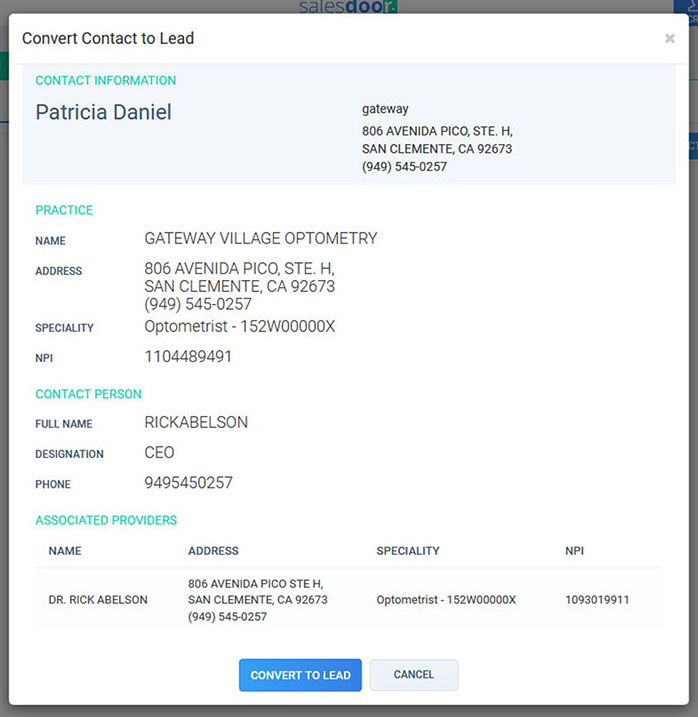
Contact is a lead now and will appear in leads category.
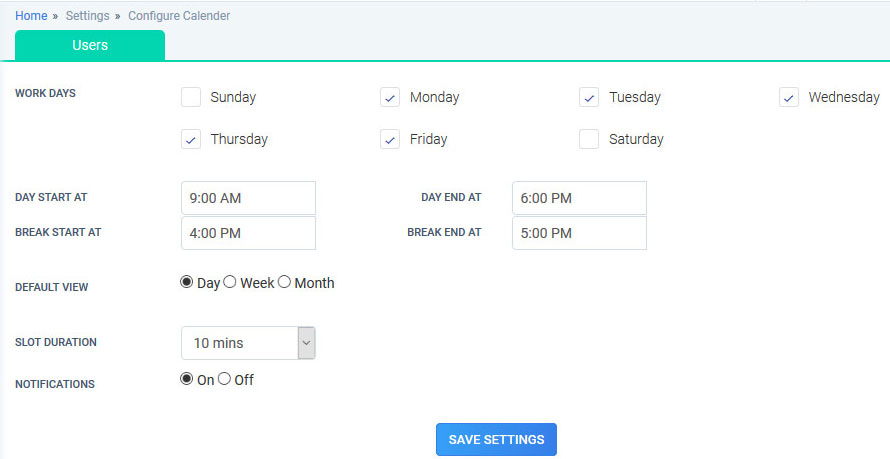
Calendar configuration module will help you configure your calendar as per your working days and hours. You can select the slot size and also set your default view i.e. day, week or month to view all your events.
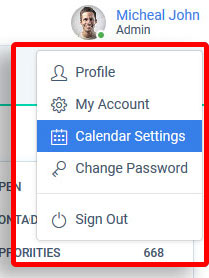
1. Calendar Configuration is the landing page after successful registration of Free Account. Alternatively, click on your name on the top right corner. Click ‘Calendar Settings’ from the drop menu.
2. Select working days according to your company’s office working hours.
3. Set “Day Start” & “Day End” timings accordingly.
4. Set default view as per your preference i.e. day, week or month.
5. Set slot duration and turn on/off notifications.
6. Click ‘SAVE SETTINGS’ button to save your calendar settings. The changes you just made will reflect in Calendar Module.
Calendar Module contains all the events created by you or your team members as per your role. You can see your events in monthly, weekly and daily view.
You can create an event for any organization and can add multiple notes in it. Event can be assigned to any user depending on the role i.e. if you are sales rep, you cannot assign event to anyone. If you are supervisor, you can assign event to anyone from your team. If you are an admin, you can assigned to any user in the system.
You can also make recurrent event for future date.
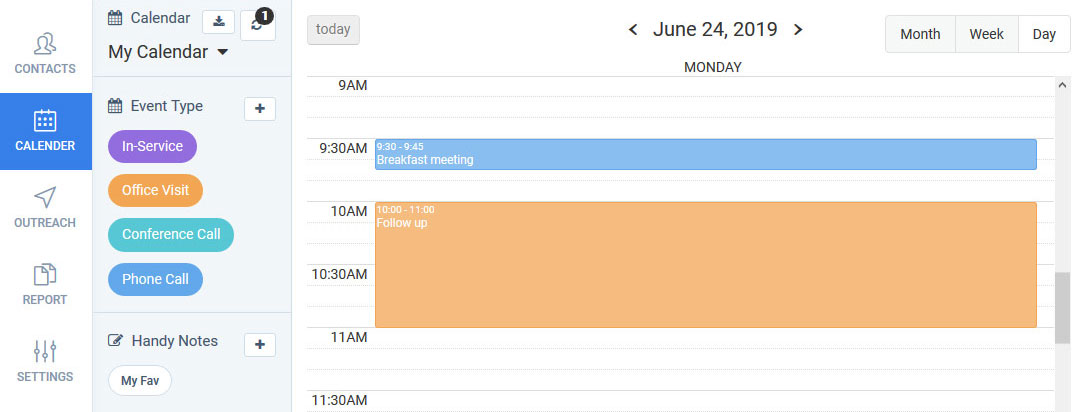
1. Go to Calendar Module.
2. Drag/Drop event type or handy note to create an note OR simply click on the slots.
If event type or handy note is selected, it will auto-fill those fields with the selected value.
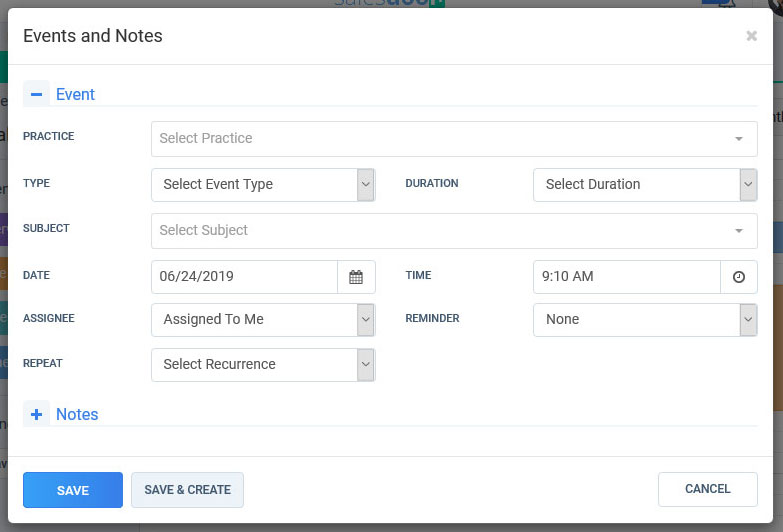
3. A form to create event opens. Enter event type, organization, duration, reminders etc.
4. You can add one or multiple notes for the doctor or contact person.
5. Click ‘SAVE’ button.
1. Go to Calendar Module.
2. Select Date and Time of event which you want to edit.
3. Click on the event from calendar.
4. A form to edit event opens. Make desired changes and Click Save button to update your event.
1. Go to Calendar Module.
2. You will find “Event Type” section on the left panel.
3. Click on “+” icon.
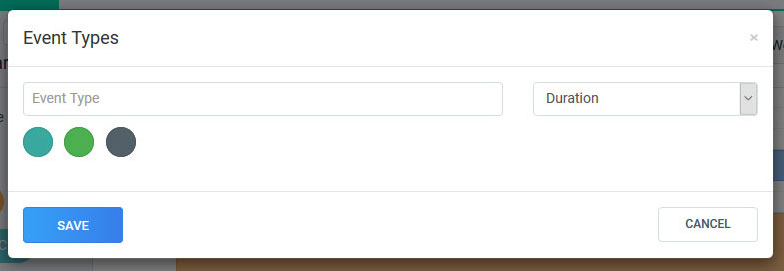
4. Enter Event type, select its duration and default color.
5. Click ‘SAVE’ button to save the event type. Saved Event type will be visible in Event Types in the left panel.
1. Go to Calendar Module.
2. You will find “Handy Notes” section on the left panel.
3. Click on “+” icon.
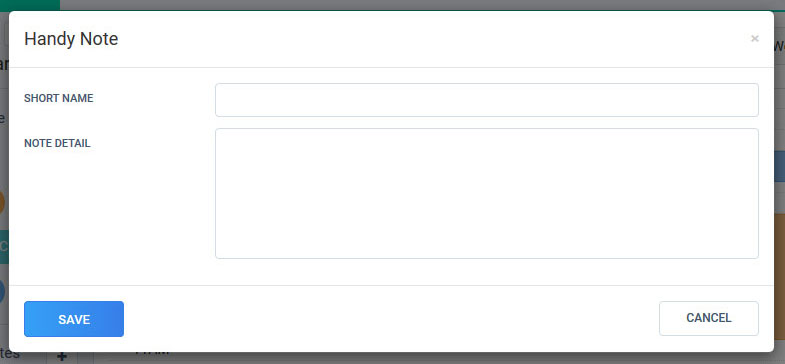
4. Enter Short Name and note detail.
5. Click ‘SAVE’ button to save the handy note. Saved short name will be visible in Handy notes section.
Salesdoor provides you with complete incoming and outgoing email functionality.
You can create multiple mailbox in Salesdoor system.
It’s very important for a user to configure at least one email account in order to send and receive emails.
Go to your profile pic on the top right and then click integrations.

Salesdoor provides its users with two main email sources.
1. SMTP and
2. Google
SMTP
SMTP server settings are required for sending emails while IMAP server settings are required for receiving emails.
1. To add an SMTP account, click Add account and this form will appear.

2. Fill in the details and then click next. This form with further open.

3. Check the details and make changes if required.
Click Add account to Add the account.

4. Added account will be listed here.

1. Click Google and you will land onto this page
From here you can view GMail accounts that are already configured.

In order to add new account click Add account.
2. Grant required permissions and click continue, you’ll be redirected here.

3. Choose an account to continue to salesdoor.com

4. Now add password.

5. To confirm your choices click allow.

As you can see recently added G Mail account is listed here.

To make a certain account default, click here.

Default mailbox appears on the top of the list.
Send Email
Click Mailbox and you’ll land onto this page.
Configured accounts are listed on the left panel.

To create an email, click create, this form will appear.

From dropdown list here, choose an email account.

Draft Email and sent . Email will be sent securely from Salesdoor
Receive Email
If your recipient replies to the email that you sent, you’ll be notified by this alert.
Click here to see the mail.
You can easily add document for leads and contacts.
1. Go to leads > patients list page> select patient > you’ll land onto patients detailed page.
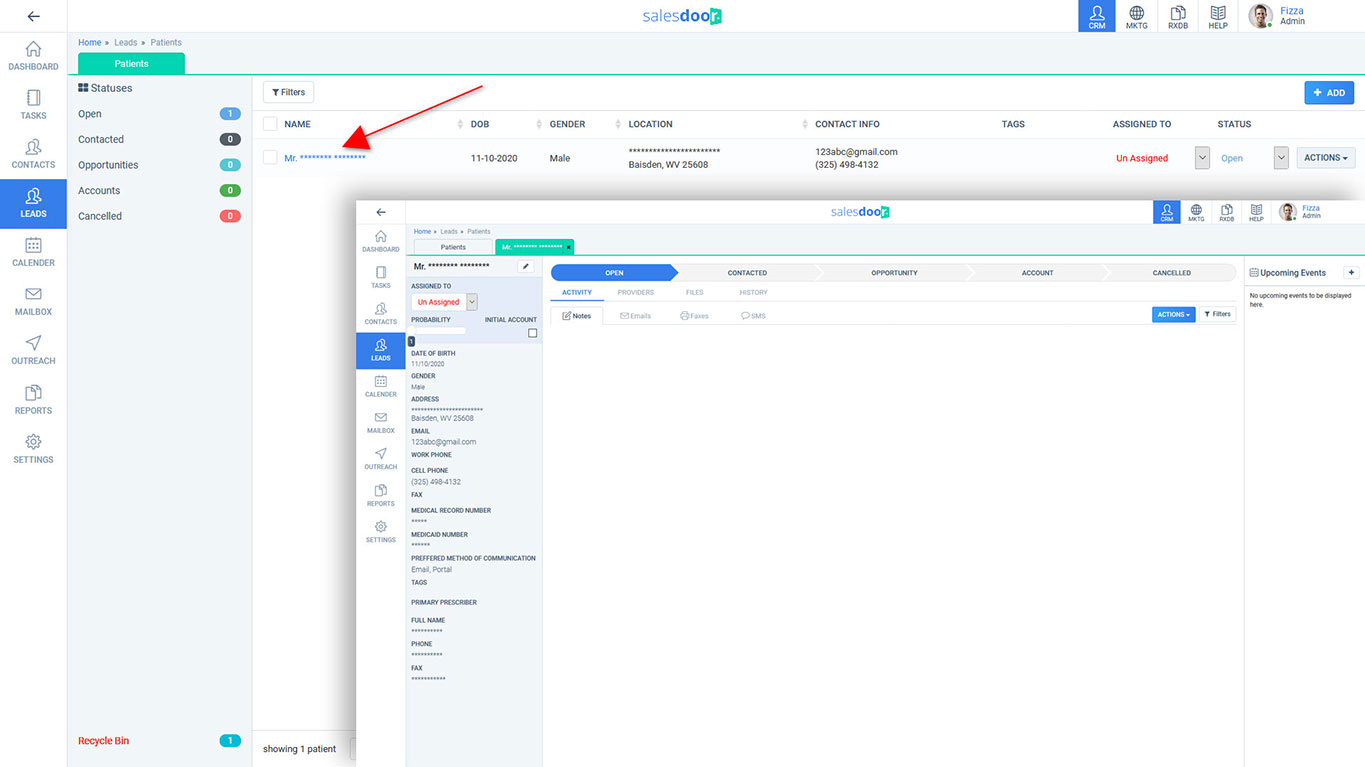
2. Click Files > then Click Add button.
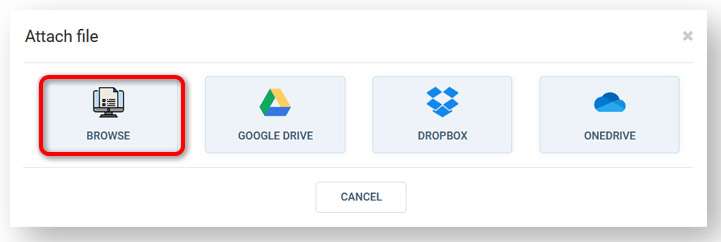
This pop up will appear> choose from the options mentioned.
You can either add document from your computer, Google Drive, DropBox or OneDrive.
Choose document from your system and upload it.
Step 1
Choose an account or add a new account.
For new account click new account and this pop up will appear.
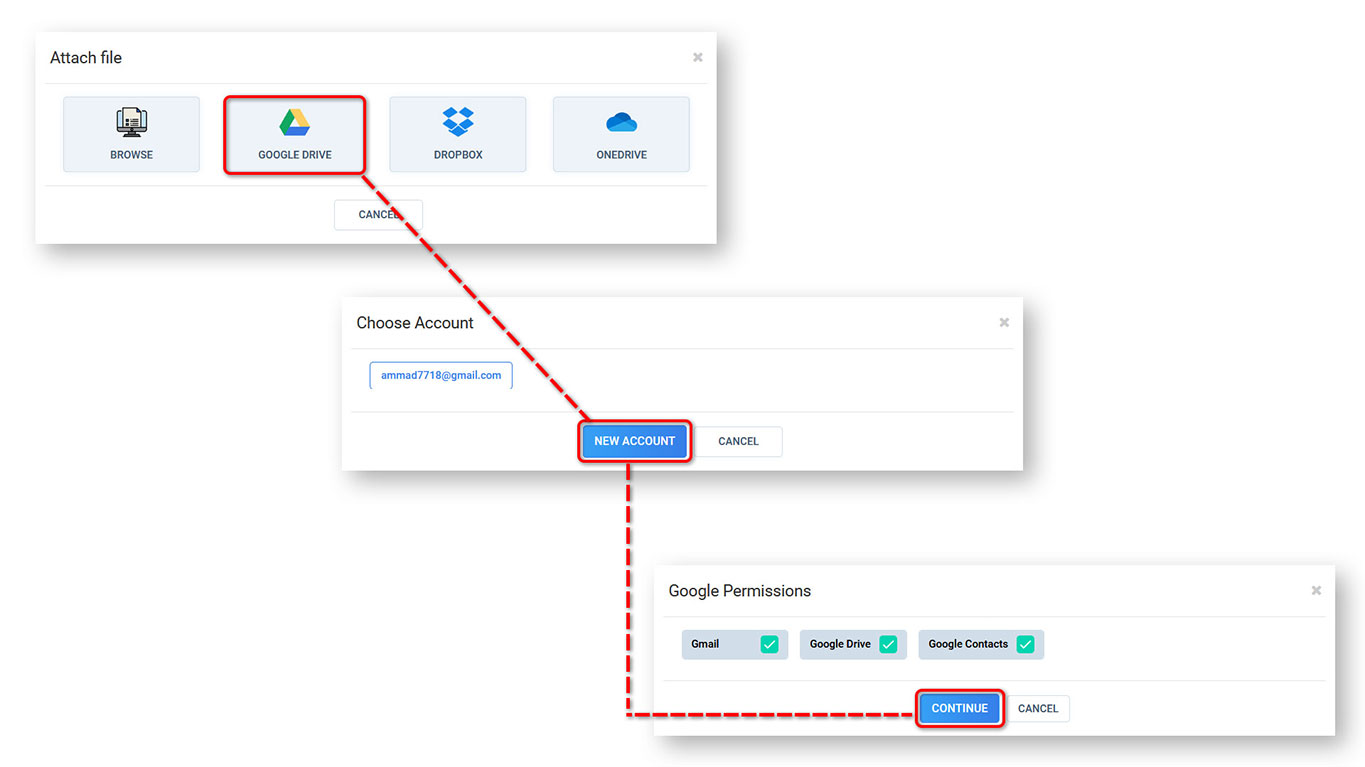
Choose required permissions and click continue.
Step 2
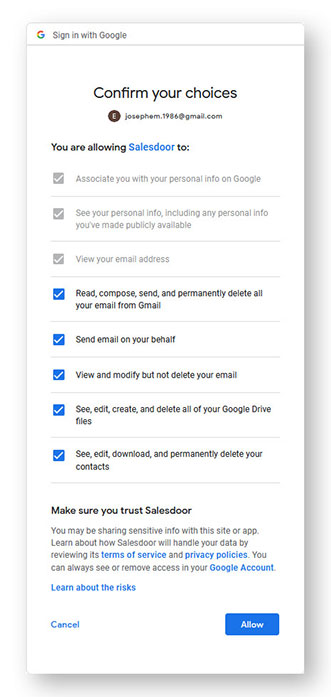
You’ll be redirected to gmail. Choose required account, add credentials and grant permissions.
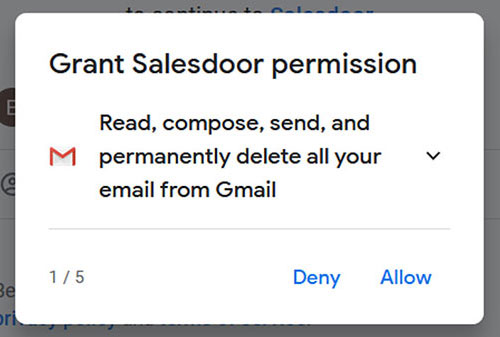
Confirm your choices and click ‘confirm’ to continue.
Step 3
Your account has been added.
Click Add and choose Google Drive, this pop will appear having your recently added account.
Select account and upload your required document.
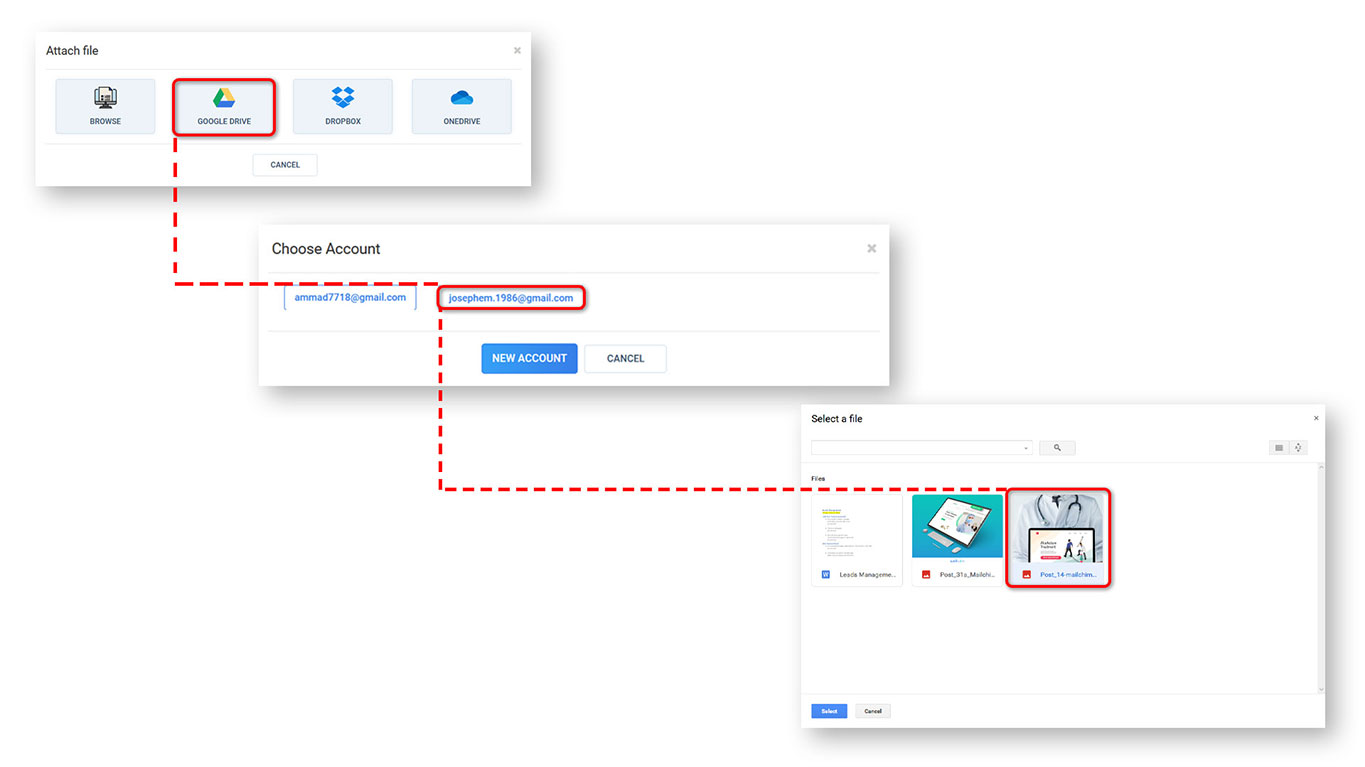
Step 1
To add document through dropbox click ‘Add’ > Click DropBox .
This pop up will appear.
Sign in from google account, apple account or sign in with email and password.
Step 2
Grant access to Dropbox wants to the Google Account.
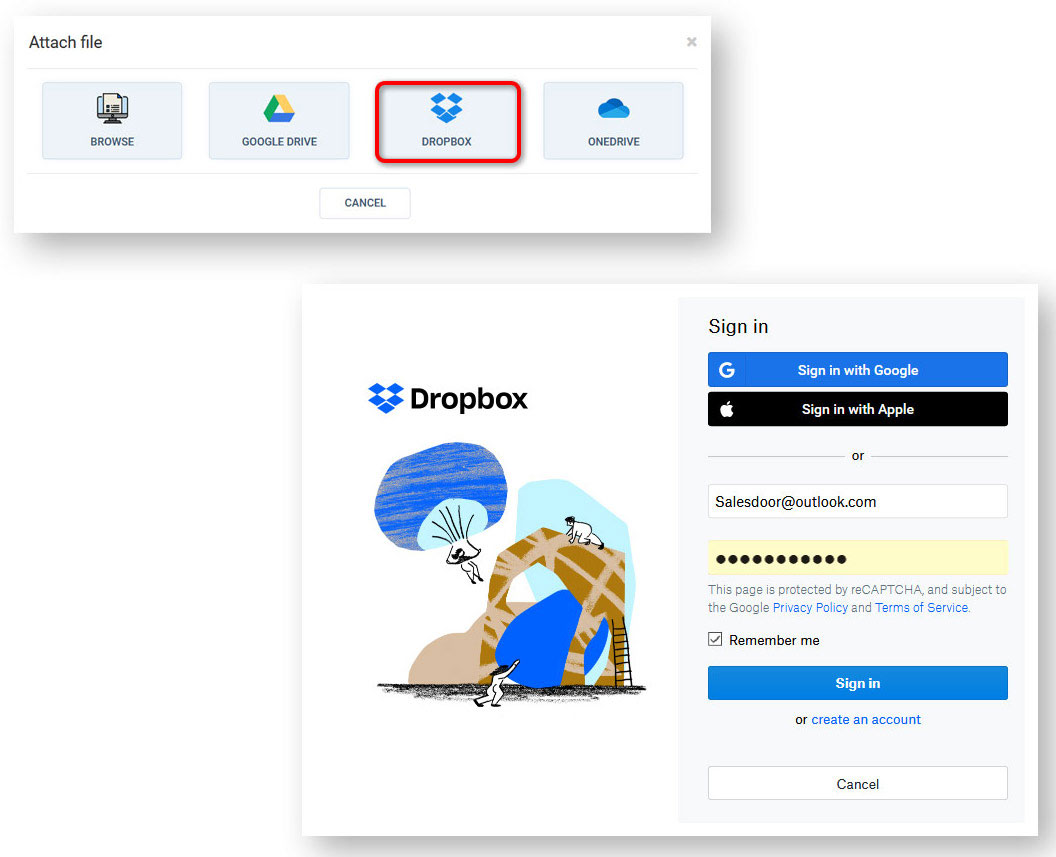
Step 3
Your account has been added to Salesdoor account.
Click Add and choose Dropbox.
This pop will appear having your recently added account.
Select account and upload your required document.
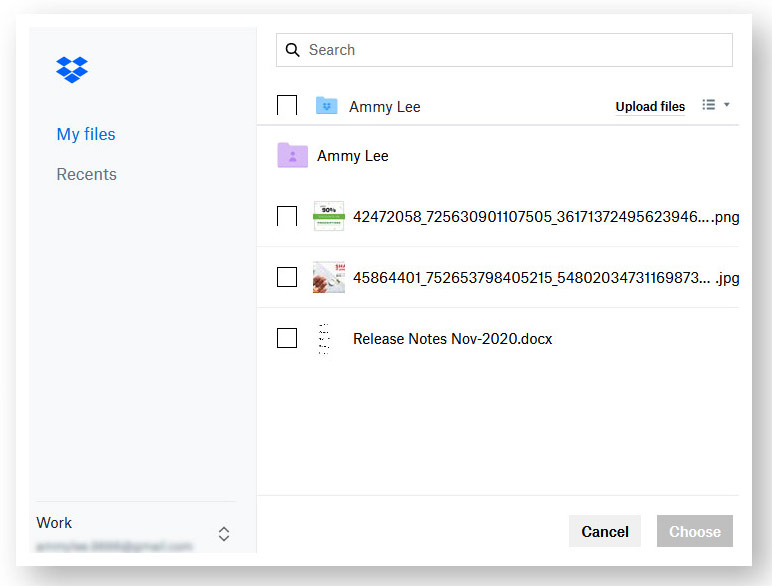
Step 1
To add document through OneDrive click ‘Add’ > Click OneDrive.
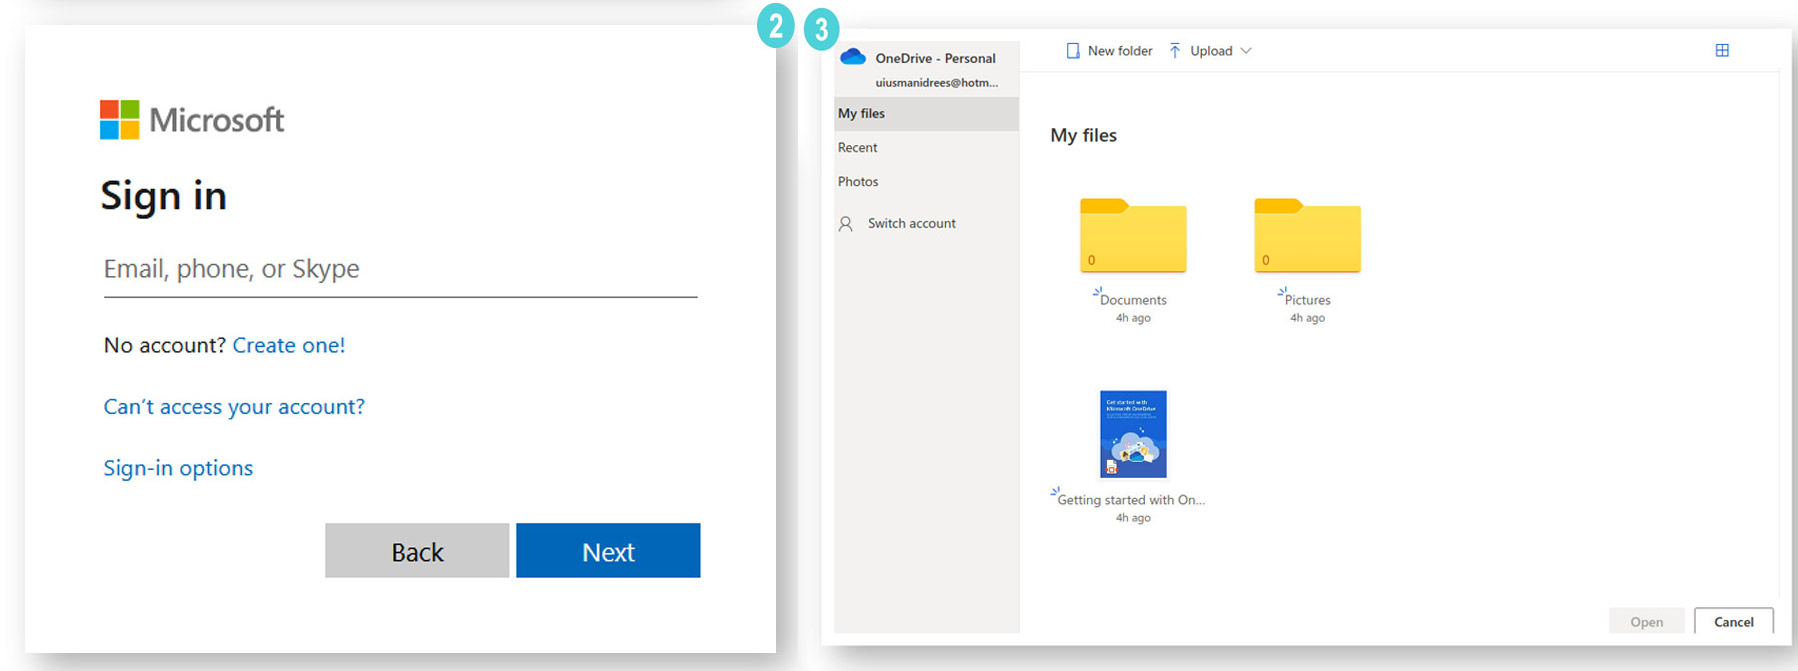
This pop up will appear.
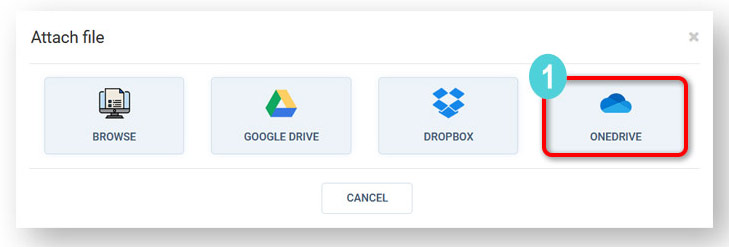
Sign in from microsoft account and click next.
Step 2
Grant access to OneDrive.
Step 3
Your account has been added to Salesdoor account.
Click Add and choose OneDrive.
This pop will appear having your recently added account.
Select account and upload your required document.
1. Go to Outreach > Notes and you will see list of notes as per your access rights.

2. You can create, edit or delete notes from this workflow.
For details go to Create Note and Edit/Delete Note sections of Leads Management section explained above.
1. Go to Outreach > Fax and you will see list of faxes as per access rights.

2. You can send fax by click on ‘Create’ button. Go to Send Fax to Leads management section for details.
1. Go to Outreach > Text and you will see list of SMS as per access rights.

2. You can send SMS by clicking on ‘Create’ button. Go to send and receive SMS section from Leads management for details.
A. Implement
1. Go to profile photo on the right corner > then click integrations.

2. Go to two-way integrations and you’ll land onto this page.
This screen will appear

Once Salesdoor has integrated phone number with your account, you’ll be able to send and receive text messages seamlessly.
Note: Entire organization will be able to send and receive messages through this number.
B. How it works
1. Send message to your contact.
2. Upon receiving a reply, you’ll be notified by an alert.
3. Open text to view SMS.
Sender of the SMS is mentioned here
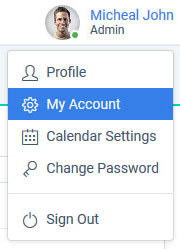
1. Click on ‘My Account’ from drop menu.
2. Click on Profile tab to view organization details.
3. You can edit your details and also can view summary of total contacts imported, total users and total outreach since the account is created.
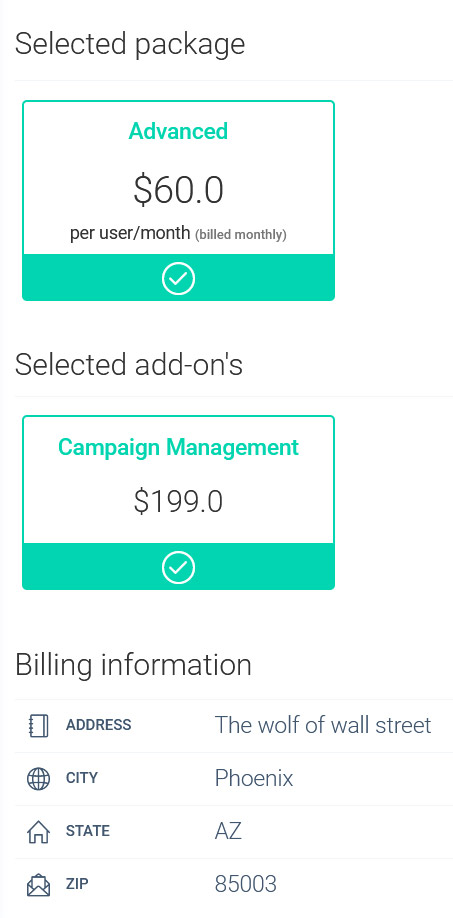
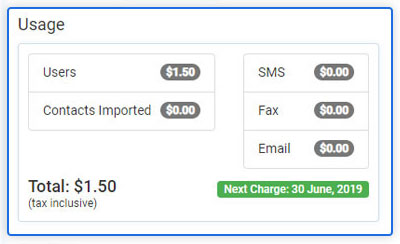
Billing details provides snap shot of current month’s usage i.e. users, SMS, Fax, Emails and contacts imported. It also shows list of all the invoices generated for your business.
1. Click on ‘My Account’ from drop menu
Click on billing tab to view billing and payment details.

2. Click on billing tab to view usage, current bill details and previous invoices

3. Click billing details to view selected package, selected add on’s, billing information.
4. To edit current payment > click here.
This form will appear
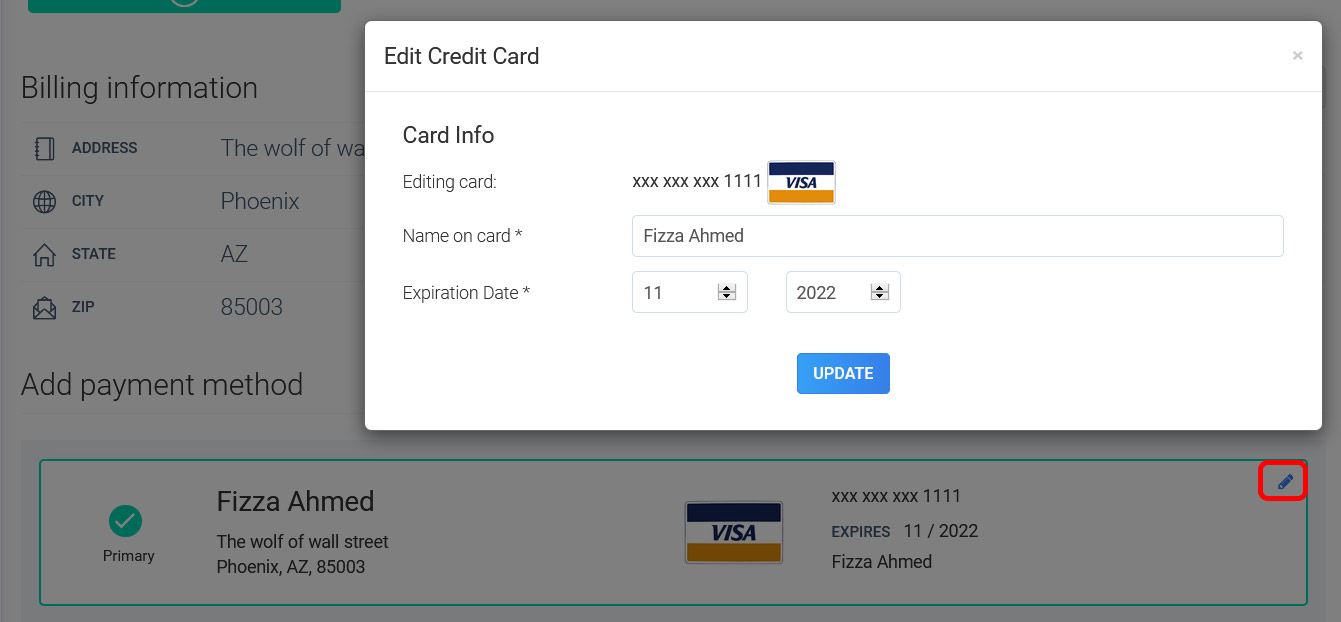
5. Make changes and update.
1. Click Add New Card > This form will appear.
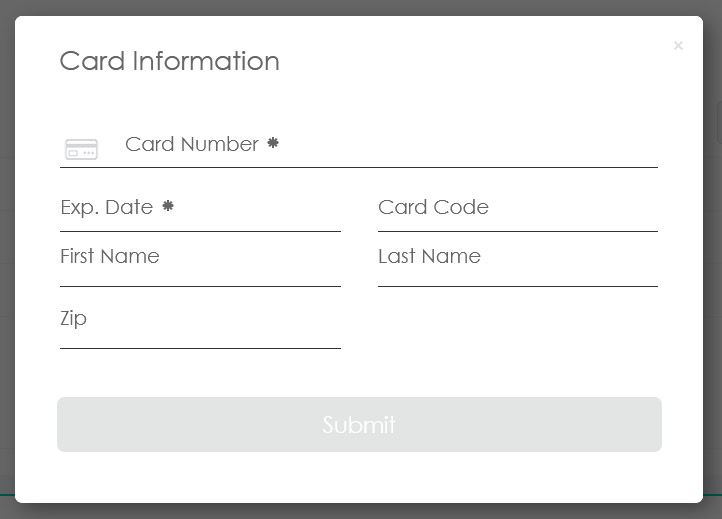
2. Fill form and submit
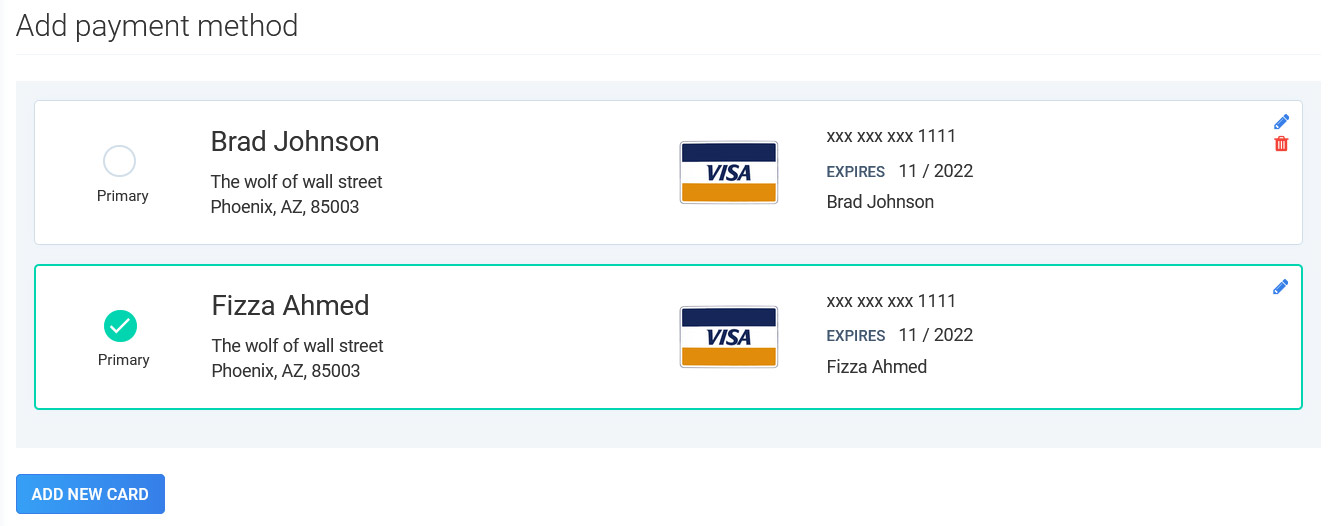
You can create multiple cards and make ONE as default for your transactions.
Fill in the details and click “Submit”.
Usage section shows current information on followings
There are number of reports for you to generate from the system. You can export records in excel sheet or can print the report.
1. Go to Reports.
2. Click on the report you want to see.
3. Provide Filters and click on ‘GENERATE REPORT’ button.
4. Upon click you will see records.
Account summary shows summary of the revenue and activities of the contact i.e. organization or provider.
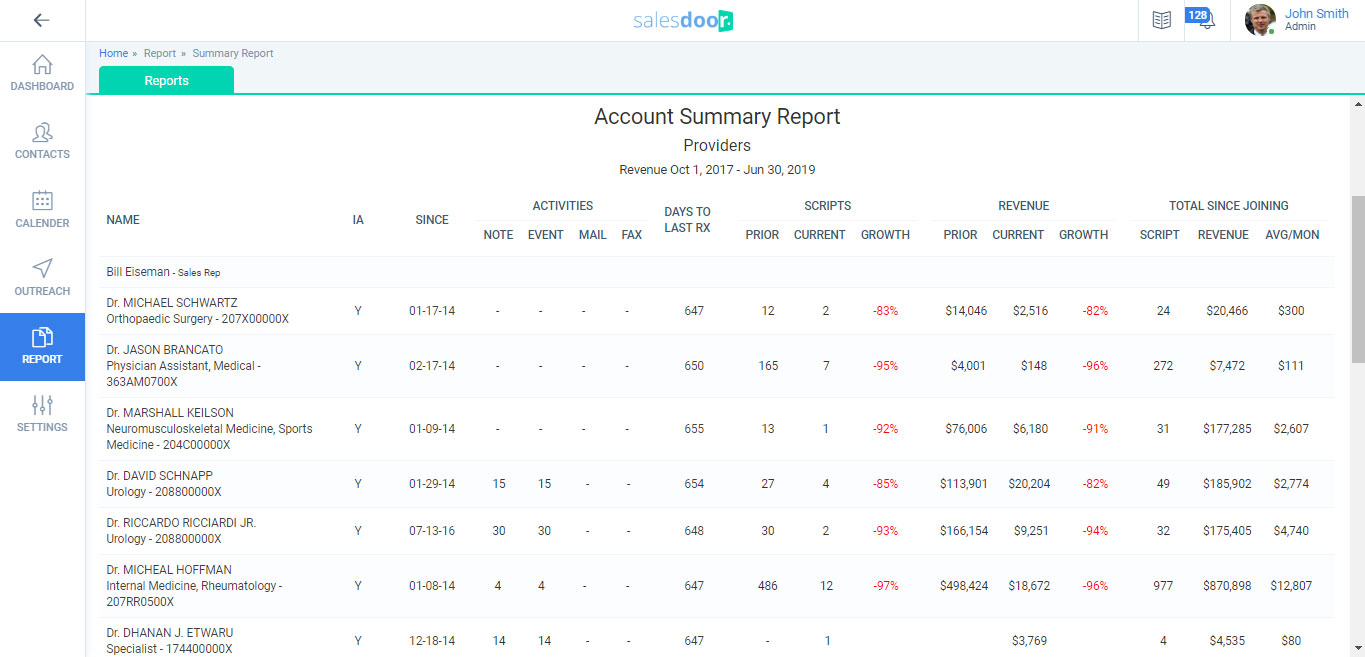
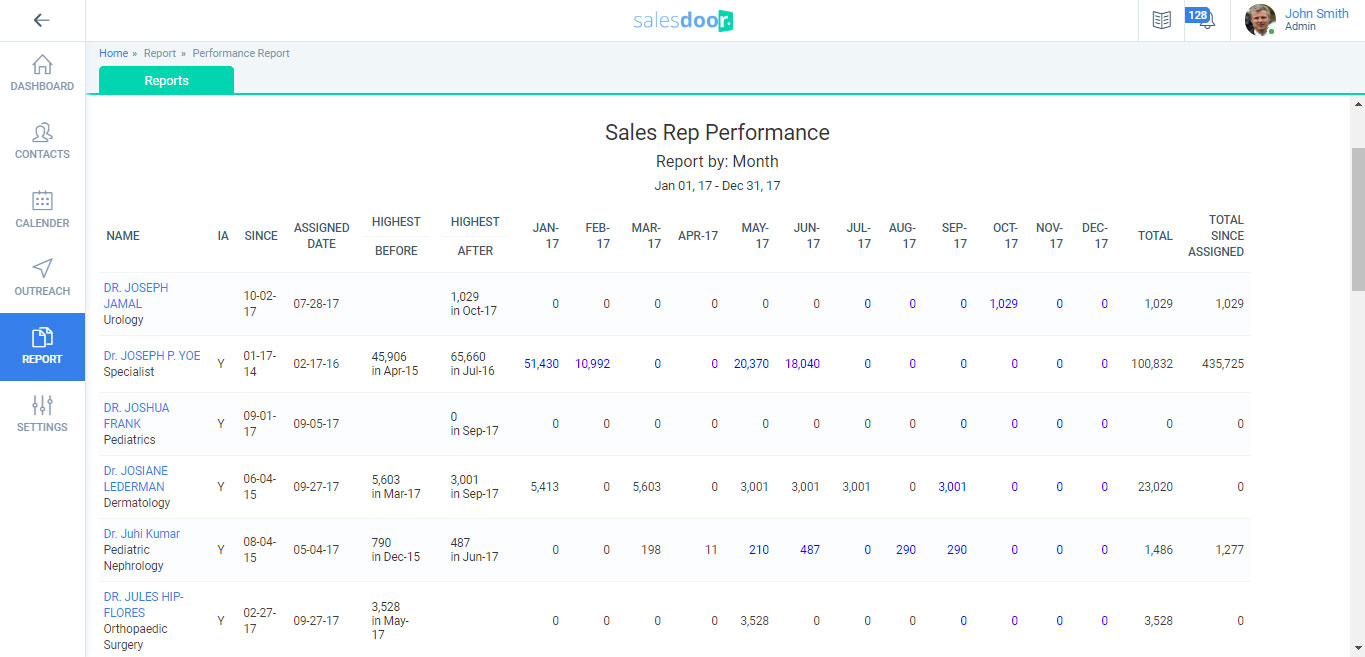
This report gives monthly or quarterly insight on sales rep performance in terms of revenue.
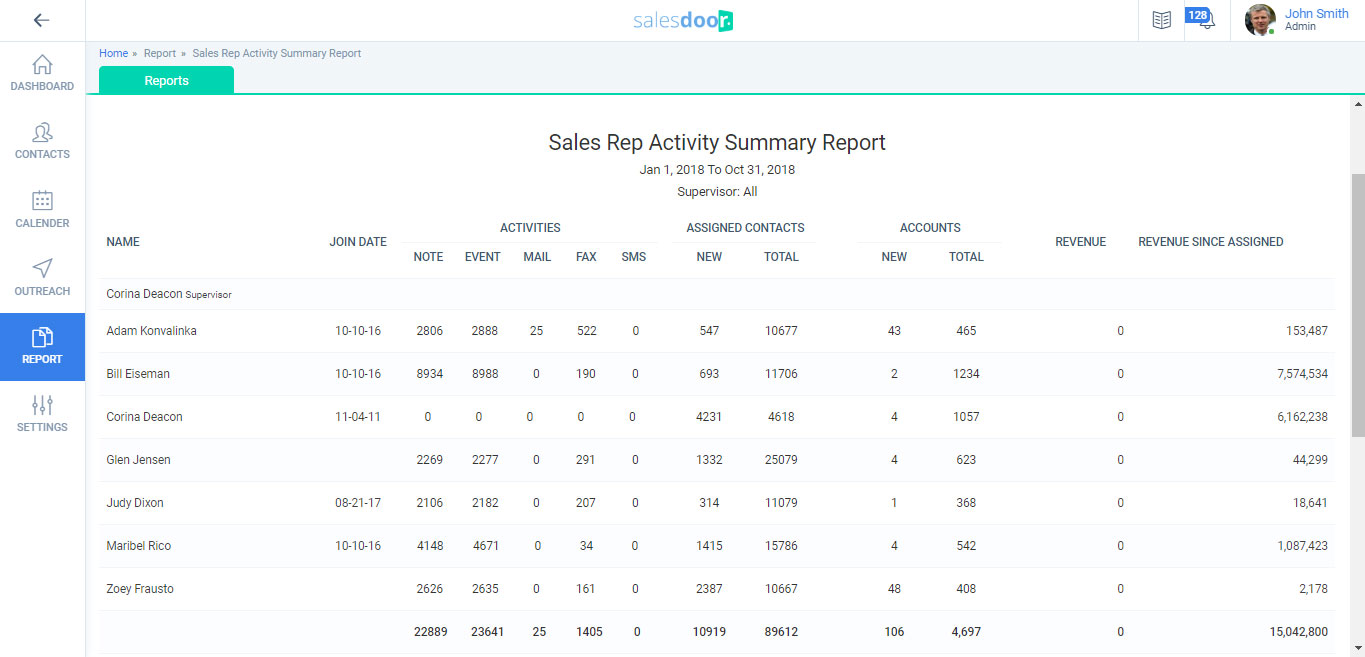
This report shows sales rep or supervisor wise summary of activities, revenue generated, accounts conversions, and assigned contacts over the specified period of time.
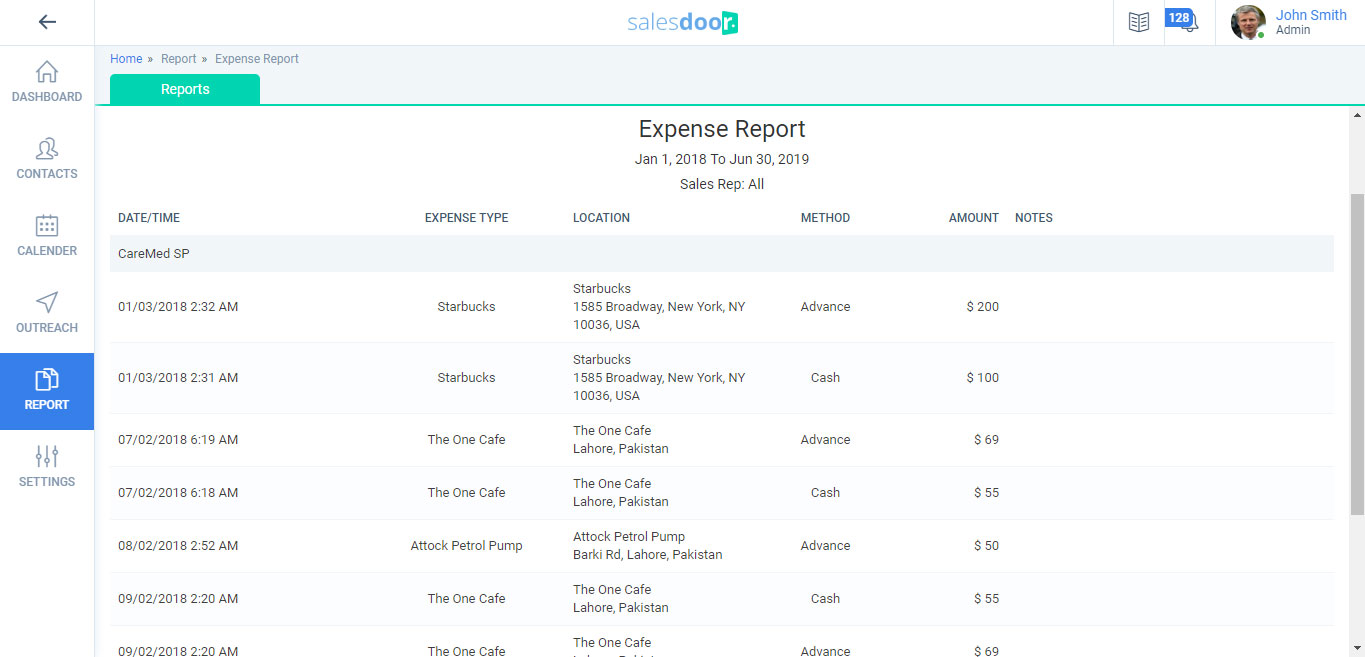
Expense Report shows total expense made by outside sales reps.
Detailed report shows your or your team’s different activities i.e. event, notes, email, fax or SMS and its detail.
